by Flagship Staff | Apr 17, 2017 | Blog
Brush up on basic fire pit safety before you build your next fire. Discover what steps you should take to keep your family safe.
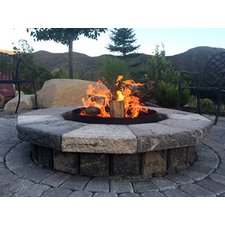
Whether you already have a fire pit or are planning to add one, invest some effort in reviewing fire pit safety. This is especially important if you’re new to using a fire pit. It only takes a second for a cozy fire to burst into a blazing inferno. Ensure you get the most enjoyment from your fire pit by keeping family and friends safe.
Fire pit safety starts with selecting the right site. Make sure the ground is level, especially when using a portable fire pit. Keep fires located at least 10 to 20 feet away from surrounding plants, as well as from nearby buildings, including your home. Check with your local city and county authorities to make sure you observe the distance required by law.
Never operate your fire pit beneath a building overhang or in a partially enclosed space. Use special caution related to overhanging trees, which can easily ignite from flying wood-fire sparks. In fire-prone areas, surround your fire pit with non-combustible materials, like crushed stone, brick, or sand.
In wood-stoked fire pits, safety begins with fuel. Only burn wood that’s been seasoned at least six months. Avoid using construction materials, such as plywood or composite woods, which can release toxic fumes when burned. Softwoods, like pine and birch, tend to produce more crackles and sparks than seasoned hardwoods, like oak or hickory. For wood-burning fire pits, cut logs so their length is less than three-quarters the diameter of the pit. Never use lighter fluid or gasoline to start a fire in a fire pit.
If your fire pit has a screen, use it whenever you’re burning. It’s also a good idea to have a bucket of sand or garden hose handy to deal with wayward sparks from wood fires. Attach a hose-end multi-pattern nozzle to the hose, setting it to “spray.” A shower-type spray douses a flare up, while a direct stream of water can spread sparks. Keep fire gloves nearby to handle hot parts of the fire pit safely.
Position chairs so folks can rise and move about seats without risking tumbling into the fire. Built-in seating prevents seats from being drawn too close to the flames; so do heavier chairs. Keep an eye on children whenever a fire pit is being used. Don’t allow them to get too close to the blaze.
Invest in a fire blanket to help extinguish sparks, the fire, and, if necessary, anyone who might catch fire. Also have a fully charged, dry-chemical fire extinguisher on hand with a Class B and C or multipurpose rating. Make sure you understand the effective range, which is typically 6 to 10 feet, and know how to use it properly. On gas fire pits, turn off the gas before attempting to extinguish a fire. Avoid lighting a fire in windy conditions.
When you’re done enjoying your fire for the evening, douse it properly. Most manufactured fire pits offer specific instructions for extinguishing a fire. Review the instructions before it’s time to put out your fire. Water can crack ceramic fire pits and some metal ones.
by Flagship Staff | Apr 10, 2017 | Blog
Now that spring is here, neighborhoods are starting to come back to life. More people are walking, kids are riding their bikes and scooters, and some have even started yard work.
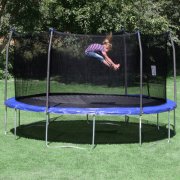
Another sign that spring has arrived is neighborhood kids playing on trampolines. Trampolines have become a popular addition to many back yards. Trampoline parks are also popping up in larger cities. While they’re fun and provide our kids with exercise, they can be dangerous if safety guidelines aren’t followed.
Between 2002 and 2011, more than one million people visited emergency departments for injuries sustained while using trampolines. These visits totaled $1 billion in expenses.
On the flip side, there are benefits of trampolines.
Trampolines:
Improve your balance
Firm and tone muscles
Offer a low impact exercise
Provide a great cardiovascular workout
Get kids off video game systems, computers, and smartphones
If you have a trampoline or are considering one for your kids, here are some things to keep in mind.
1. Talk to your insurance agent. Before spending any money on a trampoline, talk to your independent insurance agent. They can tell you if your current homeowner’s policy provides coverage for it.
2. Avoid letting young kids use it. The American Academy of Orthopaedic Surgeons recommends limiting access to kids age six and under. Remove ladders and other things around the trampoline that would allow them to get on it by themselves.
3. Adult supervision. No matter how old your kids are, they always need adult supervision. Age and maturity of your child may determine how much supervision is necessary. Always be aware of what’s happening on your property, especially if you have a swing set, trampoline, or swimming pool. Occasional glances can ensure rules are being followed and kids are safe.
4. Establish written rules. My neighbor has a trampoline. Before my daughters could use it, they had to agree to the written rules. Written rules:
Limit the number of kids on the trampoline
Prohibit food or drink
Enforce no rough housing
Enforce no aerobatics or risky tricks (i.e., somersaults, backflips).
5. Talk to other parents. If neighborhood kids are using your trampoline, talk to their parents to make sure it’s okay with them.
6. Attach safety devices. Purchase and attach quality padding to the frame and springs of the trampoline and use quality netting around the perimeter to help prevent kids from falling off. Avoid buying cheap protective gear.
7. Place it on a flat clear surface. When setting up your trampoline, make sure it’s on a flat surface away from trees, fences, swing sets, swimming pools, etc.Place it on sand or bark chips that can provide some cushioning. Never place it on a concrete surface.
8. Periodic inspections are necessary. Periodically inspect the trampoline looking for tears, broken springs, loose bolts, and worn safety pads and netting. The different weather patterns in the Midwest can cause the equipment to deteriorate.
Additional Resources
Trampoline Safety
Installing safety net on your trampoline
Set up trampoline enclosure
Do you have any tips you’d like to share? I’d love to hear them; please share them in the box below.
Sources:
http://www.huffingtonpost.com/2014/04/29/trampoline-injuries-fractures-broken-bones_n_5227768.html
https://www.cpsc.gov/PageFiles/137868/085.pdf
by Flagship Staff | Apr 3, 2017 | Blog
Isn’t technology great? Every day we see new technology that makes our lives better, more efficient, and safer. Cellphones have facetime capabilities and great cameras. Fitbits track our active lifestyles. Hover boards … who wouldn’t want one? Back-up cameras in our vehicles help us see things we normally wouldn’t.
But sometimes you have to wonder if all of these great inventions really DO make our lives better and safer. Take the back-up cameras in our cars. While they’re helpful in providing a view we normally can’t see, they can lead to more accidents because drivers may rely too heavily on them.
Back-up cameras were introduced as early as 2003. At that time, just three car models, out of 278, offered the cameras. By 2017, it’s estimated that all but 20 of 362 car models will have back-up cameras! In fact, the federal government has mandated that all new vehicles sold in the U.S. have back-up cameras by 2018.
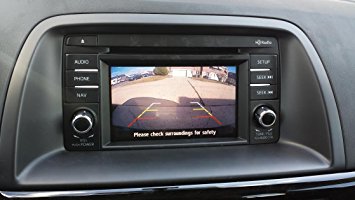
The primary purpose of back-up cameras is to prevent “back over” accidents of young children who are not otherwise visible to the driver. That said, the cameras are typically located on the back of the car at about waist level. The camera provides a great view of objects immediately behind the vehicle, as well as 50 to 70 feet behind the vehicle. The camera view typically extends to 8 to 10 feet on each side of the vehicle.
Despite the quality of the image and size of the screens in the car, back-up cameras only provide a limited view of what’s going on behind and around the vehicle. In fact, most cameras only provide an 80-degree field of view behind the vehicle. That leaves 280 degrees of view around the vehicle not accounted for if the driver only views the back-up camera while backing. That’s why it’s critical, for their own safety and the safety of those around them, that drivers do not become overly dependent on back-up cameras.
Using the back-up camera only limits your view to 80 degrees of your surroundings.
Even with the significant increase in the number of vehicles with back-up cameras, the National Highway Traffic Safety Administration (NHTSA) reports that back-over accidents have gone down by only 8% (statistics from 2008 to 2011).
Backing is the most difficult maneuver in a car and yet we perform it when we usually first get into the car and aren’t yet in the “driving mode.” When you’ve been out driving a while and are in the driving mode, practice backing into parking places whenever practical. It allows you to drive past the opening before you back into it and get a complete view of any obstructions like children’s toys, etc.
This is why you see UPS trucks and Wisconsin State Patrol cars backed into spaces when parked. They park while in the driving mode so when they leave, they’re not backing out which, again, is the most difficult maneuver to perform when they’re not in the driving mode.
To prevent property damage and personal injury, every driver should practice these steps to safe backing:
1. Whenever possible, park so you avoid backing altogether.
2. Walk around the vehicle before backing up to make sure your path is clear of people and obstructions. Remember this acronym: G.O.A.L. – Get Out And Look.
3. Back slowly, watching for people, vehicles, or objects entering your path of travel.
4. Frequently check mirrors and blind spots, scanning from left to right. Check the left blind spot by looking over your left shoulder, check the left side view mirror, check in front of the vehicle, check the rear view mirror, check the back-up camera screen, check the right side view mirror, check the right blind spot by looking over your right shoulder. Repeat this frequently while backing.
Back-up cameras can be convenient by providing a view you normally wouldn’t have. They should not, however, be the only view you use when backing up.
Turning your head while using the side mirrors, review mirror, and back-up camera, greatly improves visibility and reduces the potential for accidents.
Do you have any tips or information you’d like to share? I’d love to hear them; please share them in the box below.
by Flagship Staff | Mar 27, 2017 | Blog
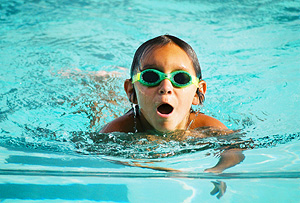
Being a parent, running from activity to activity with your children can be taxing on everyone. But more than any other activity, the benefits of enrolling your children in swimming lessons cannot be overlooked. Not only do swimming lessons provide a lifesaving set of skills, it’s surprisingly good for the body and the brain.
Here are five keys reasons to consider swim lessons for your children and how you can find great swimming options for your family near you.
1. Swim lessons reduce the risk of drowning.
When it comes to the health of your children, consider the benefits of diving in the deep end. According to the Centers for Disease Control and Prevention, drowning is a leading cause of unintentional injury death among all age groups of children, but especially for children aged 1–4 years. The best way to counteract this statistic — enroll your children in swimming lessons. The American Academy of Pediatrics found that children enrolled in swimming lessons had an 88% reduced risk of drowning.
More interestingly, it is estimated that 37% of adult Americans cannot swim, according to the Centers for Disease Control. So if you fall into this minority, consider joining your children in their weekly lessons.
2. Swimming does a body good.
Swimming is a great recreational sport that can be used for many types of fitness activities and fun. Time spent in the pool works every muscle, from head to toe, and can actually help youngsters develop long, lean muscles and general muscle endurance. Not only that, the gentle, low-impact nature of swimming is great for growing bodies, improving flexibility, and strengthening core muscles.
3. Physical activity boosts brainpower.
There is no arguing science when it comes to the link between fitness and academic achievement. Study after study has shown that when children are active, their test scores and overall academic achievement increases. In fact, researchers have found that math scores, in particular, can improve greatly when young children engage in physical fitness activities, whether it is swimming or just playing a game of tag.
4. Low cost to get started.
Unlike other sports and recreational activities, swimming requires very little investment in equipment. Most people own a swimsuit, and that is usually all you need to get started. If your child progresses in the sport, you may need to invest in a good pair of goggles and a swim cap, but the cost comparison to other individual and team sports is substantially lower.
5. Kids who swim get the benefits of individual and team dynamics.
Sports and physical activities push children out of their comfort zones when it comes to competing, physical capabilities, and working as a team. Recreational swimming provides independent and group challenges, encouraging children to hone their individual skills and work together to help one another in games and group activities. Competitive swimming has many event options, including both individual and team races. So regardless of the activities or the level of competition your children choose to participate in, swimming can provide great skill development when it comes to confidence, teamwork, encouragement, and friendly competition.
How To Find Swimming Lessons Near You
Finding the right location to enroll your children in swimming lessons doesn’t need to be difficult. Check out these great local options near you.
Find Your Local YMCA
With a focus on the community, many YMCA’s offer a variety of educational and sports activities for youth. Find a YMCA in your local community using the handy search option on the homepage of the YMCA USA website. Once you pinpoint the locations near you, determine if your local YMCA has a pool and check out their class schedules.
Check Your Local Community Education Programs
Many local community education programs offer swimming lessons at high schools and community pools. Many communities have a Seasonal Recreator or Program Guide, which outlines the upcoming activity and sport schedules offered to local residents. Check out your local recreation department to see if they offer classes for youngsters in your area. Be aware that some smaller communities join together and offer services at a central community location.
Private Swimming Schools
As with many sports nowadays, there has been an increase in the number of privately-run institutions. Swimming schools are no exception. While the costs are often higher at a private swim school, you know you are getting true expertise with highly-trained staff and facilities dedicated solely to swimming education. Use your local Google search to find swim schools in your area.
Swimming offers many great benefits for your children. I wish you the best of luck as you search for the right swimming options for your family.
Do you have swim lesson experience(s) you’d like to share? I’d love to hear them. Please share them in the box below.

by Flagship Staff | Mar 20, 2017 | Blog
When deciding whether to buy or rent, there are many factors to consider, including, but not limited to, job stability, relocation, and relationships. When it comes to financing, costs associated with owning a home include the mortgage payment, property taxes, insurance, utilities, and maintenance – which, as many people know, can be never ending! And that’s not all. Many millennials graduate from college with thousands of dollars of debt.
With all of those expensive variables, it’s understandable that saving for a down payment isn’t a priority. So many millennials choose to rent.
One important cost that applies to both owners and renters is insurance. Yes, that’s right! Most landlords require this as part of the lease agreement. Even if it’s not in the lease, it’s in your best interest to carry insurance for your personal property, as well as for liability.
You may think you don’t have much to insure, however if you take inventory of everything you own, it adds up quickly. If you had to replace all of your personal property, including clothes, shoes, furniture, electronics, small appliances, sporting equipment, etc., it could certainly cause a significant financial setback. With a renter’s policy, minimum property coverage starts around $30,000 and, if you needed them, you could get higher limits.
Most people understand property coverages, however, personal liability, which is a much greater exposure, is often overlooked. Personal liability comes into play if your actions are responsible for someone else’s injury. Here are some examples: You leave a box on your apartment steps and someone trips on it. You’re responsible for snow removal and a passer-by slips on the icy sidewalk. You accidentally hit a child while flying your drone. A friend runs into a post while trying out your new hover-board. If an accident like this occurs and you’re responsible, you’d have to pay for medical treatments, tests, surgeries, prescriptions, plus their time off of work … all out of your own pocket. It’s frightening! A standard renter’s policy includes personal liability coverage which could help protect you if you’re found negligent and responsible for someone else’s injuries. Minimum liability limits start at $100,000 and can be purchased up to $1million.
Finally, what if a fire destroyed your apartment building and you had nowhere to live? The renter’s policy also provides coverage for additional living expenses. This covers any necessary increases in living expenses while you’re displaced because of a covered loss. You may have to stay in a hotel, eat out, board a pet, or incur increased mileage to get to work. These costs would be covered until you’re able to move back into your apartment.
A basic renter’s policy is fairly affordable. For as little as $150 a year, you’d have broad protection and peace of mind while you save for that American dream of owning a home!

by Flagship Staff | Mar 13, 2017 | Blog
Homeowners looking to get the best price for their home are learning that if you want to sell quickly and score big profits, you need to remove clutter and make the place look inviting, not lived in.
Staging your house can help you sell it faster and possibly bring you more money, say many real estate professionals. The cost to stage a home is typically less than 1 percent of the list price and the return is typically 1 to 5 percent over the list price.
Homeowners can hire a staging company, work with a real estate agency that does the staging for its clients or do it themselves. Here are 11 tips for staging your home that will have a positive impact on its price and appeal:
1. Give your home curb appeal
Most buyers start their home search on the Internet. Often their first impression of your home is a photo of the outside. Before you take that photo, be sure you have spruced up the grounds of the house by weeding, mulching, trimming back trees and bushes, and power washing your siding and walkways.
2. Depersonalize and declutter
When buyers come into your house, it’s important they be able to visualize themselves living there. So take down anything personal, including family photos, collections, diplomas or awards, replace them with generic artwork and photos.
3. Clean your house
Make your house shine by cleaning everything including the inside of your appliances, the baseboards and windows. Change your air filters and clean out your gutters. This will show buyers that you do regular maintenance on the house.
4. Get rid of odors
If you’re a smoker or have a pet, it’s important to get rid of odors. Be careful of using air fresheners, because many are too strong and they might suggest you are trying to hide something. Open the windows instead.
5. Neutralize colors
Potential homebuyers might not love the dark purple accent wall in the dining room as much as you do, so it’s best to paint the walls a neutral color before you start showing the house. You don’t have to paint every wall white but it should be a neutral color that will appeal to a variety of people.
6. Turn up the lights
At every open house open every blind and curtain to let in as much light as possible. If a room seems too dark or the lamp is outdated, update the lighting fixture or buy new lamp. Make sure all the light bulbs in your house are working on the day of the open house.
7. Pare down furnishings
Oversized furniture can make a room feel smaller. Furniture is there to help the buyer visualize what the room is used for, but it’s best to minimize the number of pieces so the buyer can envision their own furniture in the room.
8. Accessorize
After you remove all the clutter add some accents such as interesting coffee table books, throw pillows and blankets on the sofa, a bowl of fresh fruit on the kitchen counter and matching towels in the bathroom.
9. Make repairs
If there is anything that clearly needs to be repaired or if there are any unfinished projects, you need to take care of them before the open house. No potential buyer wants to see unfinished work inside the house.
10. Clean out the closets and drawers
Potential buyers will open every closet, cabinet, drawer and door. You will want to display as much storage as possible. Use baskets to hold items that are normally just loose in drawers and in closets to make them look less cluttered. Professionals suggest removing 20 to 30 percent of what is inside each closet to show space between items that are hanging up. This will make the closet seem larger.
11. Check the floors
If the carpeting is stained, replace it. If you’re using an old area rug, remove it. If your wooden floors are scratched, cover them with inexpensive area rugs.
Staging a home is key to appealing to prospective buyers.
