by Flagship Staff | Apr 17, 2018 | Blog
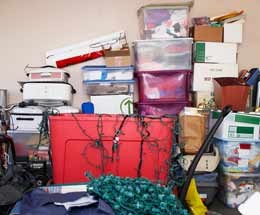
Whether you’re spring cleaning, downsizing, or preparing to move, getting rid of your unnecessary personal belongings can be a big endeavor. If you’ve experienced a recent death in the family or you’re going through a divorce the decluttering process can be even more stressful.
My parents have lived in their home for more than 40 years and went through this process a few years ago. As they progressed through different areas of their home, they found getting rid of “their junk” was therapeutic and a relief. Too much stuff or clutter in your home can make it difficult to find things, which can lead to stress.
Here are some tips to help you clean out or declutter your home this spring.
1. Break your home into sections. Depending on the size of your home and the items you’ve accumulated, this can be more than a day or weekend project. Prioritize and set completion dates for the different sections of your home you want to work on. This method won’t only help minimize feeling overwhelmed, it’ll also provide a sense of accomplishment when you cross it off the list.
2. Put it on the calendar. Look at your calendar and identify the days you want to work on this. Again, spending all day working on this project can be overwhelming and frustrating. Consider spreading it out over several days or even a month or two. Lastly, by having the project on your calendar, it can help avoid procrastination.
3. Ask for help. Consider asking friends and family members for help. Some extra sets of hands can speed up the process.
4. Make it fun. If family and friends are helping, play their favorite music or turn on their favorite sports team. In addition, consider buying them lunch or making them dinner to show your appreciation. Celebrate your success!
5. Avoid open-ended questions. Depending on the situation, getting rid of things can be emotional. By asking yes-no questions, decisions can be made more quickly, eliminating some of the emotion that may be present.
6. Create a sorting system. Before you start taking items out of your closet or from under the bed, have a sorting system in place. Label plastic storage bins or boxes with “Keep,” “Toss,” or “Donate.”
7. Coordinate with a community rummage sale. If your city or neighborhood has an annual rummage sale on a specified day or weekend, consider participating.
8. Use social media to sell items. A variety social media tools make it easy to promote items you want to sell. If you’ve never tried it, you’ll be amazed at the number of people you’ll reach.
9. Contact your local charities. If you don’t have donation organizations like Goodwill or St. Vincent DePaul nearby, contact local charities.
10. Research your disposal options. Moving items out of your home and into the garage with no place to go defeats your goal to declutter. Here are some disposal options to consider.
a. Can your items be placed in regular garbage collection?
b. Does your municipality allow you to arrange special curbside pickup?
c. Do you have a city drop off yard? If so, find out how you access it, what can be disposed of there, and hours of operation.
d. Is there a company that provides at home dumpsters? If so, research how much it costs and how long you can have it.
11. Apply the 12-month rule. If you haven’t used or worn something in the past year, does it make sense to keep it? I chuckle when it comes to this rule. I’ve struggled with weight my entire life. I have pants and shirts in many different sizes. I tend to keep them because I never know when the big weight loss or gain is going to happen so I have to be prepared. My wife often says, “Seriously, do you think you are ever going to wear that again?” After I ponder her question, the answer is usually “no.” If you don’t use it, lose it!

by Flagship Staff | Apr 10, 2018 | Blog
Moving from your home to another can be a daunting task, especially if you’re moving to a new city. Personal items can get lost or broken, heavy items can cause bodily injury, and your current furniture may not work in your new home. In addition, if you have kids, they may have their own worries, which can add another element of stress to the moving process.
As the weather warms up, and it gets closer to the end of the school year, more families will endure the moving process. If you’re moving with children here are some tips that may help.
1. Break the news gently. As adults, we often hear the phrase “change is good.” While that may be the case, trying to explain a job promotion to children can be difficult. When it comes time to talk to your kids about moving, make it a fun event. Take them to their favorite restaurant or park. Gradually work the idea of moving into the conversation. Talk about the new fun things you’ll be able to see and do in your new city.
2. Continue the conversation and planning with them. After you’ve introduced them to the idea of moving, keep them in the conversation. Talk to them about packing, colors for their new room, and meeting new friends. By keeping them in the conversation, you’ll be able to identify things that may trigger anxiety for them. This will allow you to talk to them about what is making them anxious. This is a much healthier approach than having them keep their emotions all “bottled up”.
3. Try not to deviate from normal schedules. Life can get hectic prior to the big move. Family dinners and bedtime schedules are often overlooked. Do your best to keep a bit of normalcy in your daily schedule. If Thursday night is family night, keep it on the schedule.
4. Keep in touch with family and friends. Today’s technology makes it easy to stay in touch with friends and family from afar. Develop a plan or talk to your kids about how they can stay in contact with family members and friends.
5. Take plenty of pictures. Before you move, take plenty of pictures of friends, your home, and other places that have created family memories. These pictures can be helpful during the transition to your new home, especially if you’ve moved to a new city. External hard drives and cloud storage make it easy to store photos. In addition, consider sharing pictures of your new home ahead of the move.
6. Make introductions. After you get settled into your new neighborhood, introduce your family to your neighbors. This makes it a lot easier for your kids to make new friends.
7. Spend adequate time at their new school. When it comes to moving, starting at a new school is probably the scariest element for them. Simple things like whom will they sit with at lunch or play with at recess can be overwhelming. Make sure you spend adequate time with their teachers and administrators. Tour the school frequently so they’re comfortable when the first day of class arrives.
8. Keep their favorite items close. Pack a small bag or suitcase with their favorite items. This can help keep them comfortable on long car or plane rides, as well as during an overnight hotel stay.

by Flagship Staff | Apr 3, 2018 | Blog
Cats and dogs add endless joy to our lives. They’re cute, cuddly, and unconditionally love us. However, pets also scratch, claw, break, and chew things. They can do their fair share of damage to the home if not properly trained (or if they just feel like it). Window treatments are tempting and present a prime opportunity for pets to get into mischief. After all, they’re just hanging there, asking to be swatted, tangled, and chewed on. Avoid the mess and safety hazard by choosing window treatments that can stand up to your furry friends.
Cordless blinds and shades
While dogs and cats may still claw and scrape at the blinds if they can reach them, cordless blinds take the cords out of the picture, so animals won’t get caught up in them. Ditch the cords and choose cordless shades or faux wood blinds that you easily open and close by pulling them up and down.
Faux wood blinds
Faux wood blinds are more durable than aluminum blinds, which means they’re less susceptible to clawing and scratching. They’re less expensive than wood blinds but look just as sophisticated. If one cracks or bends, you can easily order a replacement without breaking the bank. Unlike wood blinds, faux wood blinds are moisture-resistant. They can get wet and can be tugged at without falling apart. Also, the color on faux wood blinds is consistent throughout the slat, so if they get scratched, it’s less obvious.
Wide slat blinds
When they’re open, wide slat blinds let in more light than your average blinds and your cat or dog can see out of them more easily. They won’t be scratching at the blinds just to get more sunshine to nap in or to look for critters in the yard.
Vertical blinds
The areas in front of sliding doors and porch doors are the ultimate lounging spots for pets. Outfit these doors with vertical blinds with wand control. You can easily push vertical blinds to the side so your pet can hang out without being tempted to damage them. It also takes only a few minutes to replace one of the louvers if it comes dislodged.
Plantation shutters
Plantation shutters, which are typically made of wood and faux wood, are sturdier than blinds. Before you leave for the day, open them and let in the light. Your pet can sit by the window and look outside until you get home. However, keep in mind that wooden plantation shutters may not be the best choice if you have a new puppy or if your cat likes to scratch at wood.
Motorized shades
Motorized shades can be controlled with the touch of a remote or on your phone if they’re the smart kind. With the click of a button, you can roll them up. The need for cords is eliminated, reducing the temptation for pets.
Blinds can make your home more comfortable, help you save on energy costs, and complement your home’s decor. Make sure you choose a style that works for every member of your family, including the four-legged variety.
Katie Laird is the Director of Social Marketing for Blinds.com and a passionate home decorator for her family with a love of all things Mid-Century Modern and blue. Blinds.com carries a variety of faux wood blinds and other pet friendly window treatments on the website.

by Flagship Staff | Mar 27, 2018 | Blog
Spring has officially arrived! While many people breathe a sigh of relief because winter driving has ended, spring driving can also pose dangerous situations. It’s important to understand that each season change brings different driving conditions.
Here are some tips to keep you and your family safe on the roads this spring.
1. Be on the lookout for potholes. Extreme winter weather takes a toll on our roadways, creating large potholes. Heavy rain can fill them with water making them difficult to see. These monsters can damage your car leading to expensive repairs. Damages can include:
Punctured tires;
Bent rims;
Suspension damage;
Poor alignment; and
Exhaust system damage.
Keep a safe following distance in case the driver in front of you reacts. Never swerve to avoid a pothole. This can put you and your family in a more dangerous situation. Gently brake before it if you can.
2. Slow down for spring showers. Did you know that roads are the most slippery when it first begins to rain? This is caused by the rainwater mixing with contaminants on the road, such as oil and grease. Make sure to increase your following distance to allow for proper braking.
3. Watch for animals on the move. Animal activity increases during the spring. For some, this is mating season and for others, they’re waking up from their long winter slumber. Remember, deer are most active at dawn and dusk.
4. Watch for pedestrians on the move. As temperatures increase, more people are outside walking or bicycling with their families. Slow down in your neighborhood and pay extra attention at crosswalks. If pedestrians have the walk signal, they have the right of way.
5. Share the road with motorcycles. Because of their speed and size, motorcycles may quickly come in and out of your blind spots. Always take a second look now that motorcycles are out on the road. In addition, be courteous. Motorcycles have the same right to be on the road. If you end up following a motorcycle, maintain a safe following distance of at least four seconds.
6. Maintain proper tire air pressure. During the winter months, tires lose air due to the cold temperatures, causing tires to be underinflated. Warmer temperatures can cause tires to be overinflated. Each situation can lead to increased wear and poor handling.
7. Inspect your tires. Adequate tire tread is important for wet weather driving. Tire tread actually moves water away from the tires. As tire tread wears, less tread means reduced traction. When it comes time for buying new tires don’t focus only on price. Read reviews and recommendations. Remember, you’re relying on a contact patch the size of your hand to keep you and your family safe.
8. Pay attention in construction zones. When driving through construction zones, follow these tips.
Be attentive. Construction workers and equipment may suddenly enter the roadway. Traffic patterns can change daily to accommodate the work being done.
Understand and follow the signs.
Make safe lane changes. Solid lines in construction zones mean that you should stay in your lane.
Slow down. Fines may be doubled in construction zones. In addition, slowing down can save a life.

by Flagship Staff | Mar 20, 2018 | Blog
Owning a home is a dream shared by many. Home ownership provides many benefits, such as financial security and stability, the pride of ownership, and a special place to raise a family.
Homeownership also comes with a number of responsibilities, such as cutting the grass, shoveling snow, and completing minor repairs.
While many insurance companies were started because of devastating fires destroying their communities, today a common cause of property damage is water. A burst pipe, clogged toilet, or a failing water heater can send thousands of gallons of water through your home.
Statistics have shown that your home is more likely to experience damage from water than from fire or burglary.
Below is information on:
Home monitoring/detection systems;
Signs you have a leak;
Buying guides/reviews;
Insurance coverage; and
Links to systems.
Home monitoring/detection systems
1. Home water flow monitoring system. A water flow monitoring system is attached to your water main and protects your entire house. The system works by measuring water flow into your house. If it detects continuous water flow beyond the normal stopping and starting of your everyday appliances, it stops the flow of water into your house automatically.
2. Home water flow monitoring system with sensors. This type of water flow monitoring system includes sensors that are strategically placed around your house. Depending on the sensor, it can measure water leaks, as well as temperature and humidity changes. When connected to a hub or your home Wi-Fi, alerts can be sent to your smartphone. The shutoff valve will automatically stop the flow of water into your house, with this system as well.
3. Water leak sensors. These sensors are strategically placed around your house. Locations include:
Dishwashers;
Ice makers;
Water heaters;
Toilets;
Sinks;
Wash machines; and
Showers and tubs.
The difference between this system and the others is that it sounds an alarm and may send a text message to your phone. However, it doesn’t shut off the flow of water to your house. If you’re home, this system will alert you with plenty of time to turn the water off yourself. If you’re away from home, have a back-up plan set up with your kids or neighbors.
If you’re leaving your home for an extended period, it’s best to shut off your water at your water main. Even though a leak will still cause damage, the water flow won’t be continuous.
Signs you have a leak
Sometimes plumbing problems aren’t obvious and the damage occurs slowly over time. Here are few things you can watch for in case you have a leaky pipe in your home.
1. Check your water bill. If you notice a significant increase in your bill, this may be a sign of a leak.
2. Listen for the ticking of your water meter. If your water meter is constantly ticking, this may be a good indicator that you have a leak.
3. Check for wet spots/water marks. On a regular basis, inspect areas near your sinks, tubs, and toilets. If you see discoloring or wet spots, you may have a leak. Consider placing a small towel in your cabinets near the drainpipes. If you have a small leak, the towel will prevent it from soaking through and it may be easier to notice.
Buying guides/reviews
If you’re interested in learning more about different products available, please check out the links below.
“Best Water Leak Detectors: Protect Your Home from Damage”
“Afraid that your pipes will burst? Here are the best water leak detectors”
“Best water leaks detectors for smart homes”
Insurance coverage
Depending on your insurance policy and the coverage provided, water damage may or may not be covered. Water damage to your home caused by a burst pipe or water heater is covered under a West Bend policy. However, damage to your home caused by a flood would not be covered unless you have a policy through the National Flood Insurance Program.
In addition, if your basement is flooded due sump pump overflow/sewer backup a West Bend policy would provide coverage if you purchased it. Four coverage limits give you the flexibility to carry just the right amount of coverage for your finished or unfinished basement.
If you have a home monitoring/detection system that sends you an alert when it detects water, you may be eligible for a discount on a West Bend Home and Highway insurance policy. To learn more, contact your independent West Bend agent or find an agent near you by visiting www.thesilverlining.com.

by Flagship Staff | Mar 13, 2018 | Blog
According to Tom, West Bend claims manager, March, April, and May are typically heavy volume months for sump pump claims. Significant temperature fluctuations in the late winter and early spring months can result in a lot of pooling water and saturated soil. As a result, sump pump claims often come in fast and furiously. In a given day our inside property team could easily receive 40-50 sump pump related claims. This claim volume can last a full week or two. Typically, the losses are reported quickly. An insured stepping off the last stair of their basement staircase into a foot of water usually leads to a very quick call to the insurance company. As mentioned, the spring months are “sump season”; claims during the summer months are usually more sporadic. A quick downpour of an inch or two of heavy rain during the summer months can easily overwhelm drain tiles and sump pump crocks.
Here are some facts regarding water damage.
Estimates indicate that 98% of basements in the U.S. will eventually experience water damage.
Water damage claims cost insurance companies approximately $2.5 billion annually.
The average insurance claim for water damage is $6,965.
I’ve personally experienced several inches of clean water in my basement and it’s overwhelming. Thankfully, my local restoration company responded quickly. They saved my finished basement from major damage!
Unlike other appliances, a sump pump quietly does its job and you probably don’t pay attention to it. It’s usually found in your basement and its primary function is to keep your basement dry. Below is information on:
How a sump pump works;
Types of sump pumps;
Benefits of a sump pump;
Maintenance tips;
Claim scenario; and
Insurance policy coverage.
How a sump pump works?
A sump pump collects ground water in a sump tank, also known as a basin, crock, or pit. When the ground water fills the tank to a certain level, the float travels up a float rod and activates a switch causing the pump motor to turn on. The motor then removes the water from the tank and discharges it away from your house.
Types of sump pumps
1. Submersible. This type of sump pump is the most common and it’s installed during home construction. The pump is covered inside the tank.
2. Non-submersible (Pedestal). This type of pump consists of a motor and a hose. The motor is installed above the basement floor. The hose is connected to the motor and then routed into the sump tank. This pump is less expensive and can be installed in any home at any time.
Benefits of a sump pump
1. Prevents flooding. Heavy periods of rain can cause water to accumulate around the base of your foundation. A sump pump will prevent the water from entering and flooding your basement. In addition, if you experience a burst pipe in your basement, a floor drain may not be enough to eradicate the water. A sump pump may help push this water out, minimizing the amount of standing water.
2. Reduces mold growth. Standing water can lead to mold growth. Mold can be harmful to your health and your house. Keeping your basement dry can prevent growth.
3. Prevents dampness.
4. Prevents fires. Water entering your basement can cause appliances to short-circuit which could lead to an electrical fire.
5. Relatively inexpensive. Depending on where you live, Mother Nature can keep your pump running on a regular basis. For the protection that a sump pump provides your home, they are relatively inexpensive. Keep in mind that they may last 15-30 years, so replacement does not occur regularly.
If you decide to “do it yourself”, it’s estimated that a standard 1/3 hp sump pump can cost between $100 and $200. If you have one professionally installed by a plumber it could cost on average around $1,100.
The actual cost will depend on your location, the plumber you choose, and the pump options.
Maintenance tips
Each spring, follow these sump pump maintenance tips to ensure yours works properly.
1. Remove the cover. Check the tank for debris, such as mud, rocks, or gravel.
2. Flush the system. Ensure proper pump operation by flushing out the system with water from a hose or bucket of water. When the pump turns on, listen for strange sounds. The pump should run smooth. If it doesn’t that could signal worn or damaged parts. Contact a local plumber immediately for service.
3. Inspect the float. As water fills the tank, make sure the float travels freely on the float rod.
4. Inspect the discharge pipe. Before major rain, make sure the discharge hose is free from debris, such as mulch, mud, stones, or rodent nests. Ensure that the discharged water runs away from your foundation.
5. Inspect the check valve. Make sure your sump pump has a 3/16 relief hole in the pipe between the pump and the check valve. This prevents check valve vapor locks and greatly extends the life of your pump.
Claim Scenario
Several years ago, West Bend insureds moved into their newly constructed home. As a rainstorm passed through, they did not pay too much attention. Later in the day, they went down to their basement and stepped off the last stair into water. Pea gravel from the construction process was found in the sump pit. Unfortunately, the sump pump sucked in the pea gravel causing it to be destroyed. Luckily, their basement was unfinished and most of their personal belongings were stored in totes resulting in minimal damage. Remember, it is important to inspect your system on regular basis.
Insurance policy coverage
An insurance policy may not provide coverage for sump pump overflow/sewer backup. A West Bend policy, provides coverage if you choose. Sump pump overflow/sewer backup provides coverage if your sump pump overflows or your sewer backs up, causing water damage to possessions in your basement. Four coverage limits give you the flexibility to carry just the right amount of coverage for your finished or unfinished basement.
Ask your insurance agent if you’re adequately covered.
Page 19 of 35« First«...10...1718192021...30...»Last »
