by Flagship Staff | May 29, 2018 | Blog
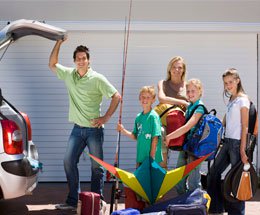
The unofficial start of summer is here! This means many families are making plans or final arrangements for this year’s summer road trip.
According to researchers, summer road trips are still very popular among families. The two main reasons are flexibility and packing ease.
If you’re planning a summer road trip with your family, here are some things to consider.
1. Give your car a tune up. Before hitting the road, it’s important to make sure your car is working properly. Consider visiting your local mechanic or check the following items yourself.
Motor oil. Depending on the number of miles you’ll be driving, it may be a good idea to get an oil change before you leave. At the very minimum, read your dipstick to determine the current oil level. If the oil is below the add line, consider adding the oil recommended for your car.
Tires. Driving a car is one of the most dangerous things you do on a regular basis. Tires play a key role in keeping you safe. Before going on a long road trip, check your tire pressure and inspect your tires for cracks, bulges, or objects stuck in them. In addition, make sure you have adequate tire tread. Tire tread is important for pushing water out from underneath you so that you can maintain control of your car. Poor tire tread can lead to hydroplaning.
Windshield wipers. Windshield wipers are often neglected when it comes to routine maintenance. Yet, like tires, they’re very important to keep you safe. Windshield wipers take a beating from the elements. The last thing you need is to be caught in a torrential downpour with poorly working wipers. Consider replacing them every six months.
Brakes. If your feet experience an unusual pulsating when you press the brake pedal, or you hear squealing or squeaking, it may be time to change them. Depending on how your drive and other conditions brakes may last 20,000 to 50,000 miles.
2. Review your vehicle warning lights. If one of your vehicle warning lights turns on, will you understand what it means? The complexity of cars is increasing. Make sure to refer to your owner’s manual for a complete explanation or check out my blog Vehicle warning lights and their meanings [Infographic].
3. Pack important information. Make sure to pack important documents, such as your:
License and registration;
Car warranty information; and
Insurance policy. If you have any questions regarding your insurance coverage, contact your agent.
4. Pack an emergency kit. If you’re stranded on your trip, there’s not much you can do other than wait for help to arrive. Here are some items to keep in your summer emergency car kit.
Water and snacks, such as energy bars, nuts, and dried fruit;
Reflective vest(s), flares, or roadside hazard triangles;
First aid kit;
External battery packs for your smart devices;
Flashlights;
Whistle;
Rain ponchos;
Jumper cables or a portable jump starter; and
Small gas can.
5. Pack a personal care kit. Rather than digging through your suitcase, consider packing a personal care kit that is easily accessible. Items to include:
Sunscreen;
Insect repellent;
Hand sanitizer;
Lip balm;
Tissues;
Body wipes; and
Medications.
6. Consider purchasing roadside assistance. If you do a lot of traveling and don’t want to be left stranded, roadside assistance may be a good investment. Roadside assistance programs can help with small items, including an empty gas tank, flat tire, lockout, dead battery, or towing.
7. Secure your pets. Pets roaming around freely in your car can be distracting and lead to a serious accident. Depending on where you travel, allowing your dog to sit on your lap may be illegal. Make sure you have an adequate size crate or carrier for your pet or consider alternative restraint options.
8. Remain calm. During summer months, drivers face many different road conditions and driving situations. There are more cars on the road and construction zones can be confusing and frustrating. The best piece of advice is to remain calm. Driving erratically or showing your emotion can lead to dangerous situations.
9. Pass the time. We’ve all been involved in car ride squabbles. Make sure your family has plenty of activities to help pass the time in the car. DVDs, smart devices, and the license plate game are just a few ideas. Don’t forget extra batteries.
10. Share your itinerary. Make sure you share your itinerary with family or friends. This way they’re familiar with your travel plans if you need help.
11. Have fun. Don’t forget, the purpose of your road trip is to enjoy quality time and make memories with your family.

by Flagship Staff | May 22, 2018 | Blog
If you have kids in high school, final exam week is just around the corner. Year-end projects are nearing completion, which leads to study packets and a stressful time for students and parents.
Exam stress can be the result of a number of factors or situations such as:
Fear and inability to accept failure;
Negative outlook or self-talk;
High or unrealistic expectations;
Being unprepared;
Family issues; and
Test-taking anxiety.
Here are some tips that can help you prepare your students for final exams.
1. Encourage them to finish strong. Whether your kids are coasting by or struggling, now’s the time to encourage them to work exceptionally hard. I’ve encouraged my daughter to do everything she can to improve her grades ahead of her finals. Some of the things she is focusing on are:
Completing extra credit;
Retaking exams or making corrections;
Receiving tutoring; and
Studying more in the evening.
If your students aren’t motivated, find something that can change their behavior. My daughter turns 16 in September. She knows she needs a B average to be eligible for the “Good Student” auto insurance discount.
2. Create a distraction free study zone. Final exam time is when the “rubber meets the road.” Study time needs to be efficient, productive, and distraction free. Set up a space that’s quiet and conducive to studying. If your students have been studying in their bedrooms, now may be the time to have them study at desk in a different part of the house.
3. Monitor your students’ smart device usage. For many of us monitoring our children’s smart device usage is a constant struggle. It’s estimated that kids spend one-third of their day using their smart devices. Consider downloading an app that can reduce their usage. I recently installed an app on our phones that allows us to create usage schedules. When the schedule activates, my daughter can only text or make a phone call.
4. Create a study schedule. Due to the amount of content, students may have difficulty figuring out what, when, where, and how to study. Create a plan they can follow. This will help them focus on studying their curriculum instead of focusing on the logistics of studying. Experts recommend studying no longer than an hour without a break.
5. Create a balance. While doing well on final exams is important, studying shouldn’t be their only focus. They should continue to do things they enjoy. Exercising or spending time outdoors can help them stay mentally focused and healthy.
6. Make balanced and nutritious meals. Eating healthy on a consistent basis is always a good goal to have. However, hectic schedules makes it difficult. During exam time, try to reduce the amount of junk food they eat. Foods high in carbohydrates and sugars can leave students feeling tired and unable to concentrate. Also, minimize their caffeine intake. Excessive caffeine can make them feel hyperactive or anxious. With the amount of stress and pressure they’re already feeling, they definitely don’t need to add to it.
7. Ensure they get plenty of sleep. Make sure your students continue their normal sleep patterns. All night cramming sessions are one of the worst things they can do. Lack of sleep makes it difficult for people to retain and recall information.
8. Stay realistic with your expectations. It’s easy for us to create high expectations for our children. While the world is a competitive place, we can’t lose sight of reality. Not every grade our child earns is going to be an A+. Some days, situations, and exams don’t go as planned.
9. Help them learn from failure. Here’s a quote from Winston Churchill. “Success is not final, failure is not fatal; it is the courage to continue that counts.” If your children fail exams, be a good listener. Let them share how they feel. Continue to encourage them to work hard, and to do their best. Lastly, tell them you love them!
10. Take care of yourself. Final exams can be stressful for parents too. Trying to manage your students’ extracurricular activities, study time, as well as your workload can be overwhelming. Don’t forget to continue doing what you enjoy to help reduce stress.

by Flagship Staff | May 15, 2018 | Blog
Is learning to ride a motorcycle on your bucket list? Now that the weather is getting nicer, you’re closer to making this dream a reality. Growing up riding dirt bikes with my friends, I know how fun and exhilarating riding can be. It offers a new perspective to seeing the world!
If you don’t own a motorcycle, you can still learn to ride. Some basic rider classes provide instruction and the motorcycle for your use. With patience, practice, and some helpful information, it won’t be long before you can cross this off your bucket list. If you’re a new rider or considering becoming one, here are some tips for you.
1. Do your research. Before beginning to ride, it’s important to do your research. If you don’t have a motorcycle, figure out which one may be the best one for you. Like cars, motorcycles come in all shapes and sizes. Visit your local motorcycle dealership(s) to learn what motorcycles they have and which ones are good for beginners. Make sure you ask a lot questions. If you feel pressured to buy, find another dealership. To learn more about the different types of motorcycles available, checkout “Six Types of Motorcycles for New Riders.”
Buying a motorcycle strictly based on price or looks can lead to dangerous situations.
2. Review your state’s motorcycle handbook. Many states have a supplementary handbook that explains:
Requirements for motorcycle operation;
Steps for getting your license;
Motorcycle laws;
Gear needed to ride; and
Handling dangerous road situations and mechanical problems.
3. Buy the proper gear. As with any new sport or activity, having the essential gear can help keep you safe. As a new rider, you’re more prone to tipping over and accidents. Riding in shorts and flip-flops aren’t the best choices. Here’s a list of gear to consider.
Helmet
Eye protection
Leather jacket and pants
Boots
Gloves
In some states, wearing a helmet is the law. To see what your state requires click here.
4. Enroll in a class. Once you have made the decision to ride, consider enrolling in a class. Basic rider classes, such as the one offered at Road America, teach basic riding skills in a safe, controlled environment. They even provide the motorcycles!
By taking a class that provides the motorcycles, you’ll be able to decide if riding is right for you without making a financial investment in a new motorcycle. To find a list of classes near you, visit the Motorcycle Safety Foundation.
5. Become familiar with your motorcycle. Operating a motorcycle relies on a lot of eye, hand, and foot coordination. If you take a class, you’ll learn the different controls. It’s essential to know these to obtain your learner’s permit through the DMV. Here’s a brief rundown of some of the motorcycle controls.
Throttle grip. This is similar to the foot petal accelerator in your car. It’s on the right side of the handle bar and is controlled by twisting it with your right hand.
Front brake. This is also on the right side of the handle bar and should be squeezed gently with your right hand to apply pressure to your brake.
Rear brake. This is located on the lower right side of the motorcycle. Use your right foot to press down gently to apply brake pressure.
Gearshift lever. This pedal is on the lower left side of the motorcycle. It’s used to change the gears as you drive. The gear pattern is usually first gear down with the remaining gears up.
Clutch lever. This is usually found on the left side of the handlebar. It’s used when changing gears.
6. Practice makes perfect. Once you earn your temporary cycle instruction permit, you can start driving on the road. If possible, practice in an area that has low traffic volume and few pedestrians. This will help you get acquainted with operating your motorcycle. After you become more comfortable, you can start venturing out to more congested areas.
7. Contact your insurance agent. Talk to your agent to find out what insurance coverage is needed for your new ride.
by Flagship Staff | May 8, 2018 | Blog
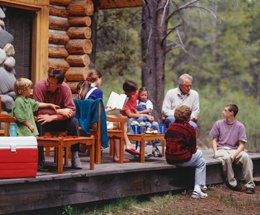
The grass is turning green, trees are beginning to bud, and the temperature is rising. It’s time to open your cottage or summer home!
While opening your cottage can be very exciting, it can also be stressful and a lot of hard work.
Whether you’re opening your cottage for the first time or you’re a seasoned professional, here are some tips that can make this year’s opening more efficient and successful.
1. Create a checklist. With all the excitement surrounding the opening of your cottage, there may be a lot of information floating around in your brain. Writing things down, such as cleaning supplies needed or chores you want to complete can help you focus on things that are important. Lastly, don’t forget the keys!
2. Contact your utility companies. If you discontinued utility services during the winter months, don’t forget to have them reconnected before you leave home. Services could include electricity, propane, water, phone, internet, and TV.
3. Contact your insurance agent. If you’ve made changes since last year, contact your agent to make sure your insurance coverage is up-to-date. If you bought a new boat at the annual boat show, you’ll definitely want to make sure you have coverage. Check out the blog “Protect your watercraft and enjoy your summer!” to learn more.
In addition, if you have a fun summer car in storage near your cottage, make sure you’ve added insurance coverage back on before driving.
4. Conduct a physical inspection. Before unloading the items from your car, conduct a physical inspection inside and outside of the home. On the outside, look for:
Fallen tree limbs, branches, and other debris;
Curved or loose roof shingles or other defects;
Cracked windows or damaged screens;
Loose floor boards or railings on your deck or patio;
Evidence of rodent infiltration;
Different or unpleasant smells; and
Low hanging utility lines.
Several of these items will apply to the inside as well. In addition, check inside for:
Wet or stained carpet, ceiling, or furniture;
Damaged wiring; and
Damaged appliances.
Once you turn the water back on, inspect water lines and check around your sinks and toilets to make sure there are no visible water leaks.
If you find damage, contact a local contractor, plumber, or electrician. Also, don’t forget your insurance agent.
5. Clean your septic system. If you didn’t have your septic system pumped when you closed your cottage, make sure to take care of it now.
6. Inspect your fireplace. If you have a wood burning fireplace that you used during the fall or haven’t cleaned for a number of years, consider having it inspected and cleaned by a reputable chimney sweep. Creosote is a residue that travels up your chimney and builds up on your flue over time. In fact, some creosote builds up every time a wood burning fireplace is lit. If that residue isn’t properly cleaned out, the chance of a fire igniting in your chimney increases.
7. Prioritize your projects. Once you have inspected your property, create a prioritized list of projects you need to complete. Again, this will help free up your brainpower for other things.
8. Dispose of oily rags properly. This is very important! If staining your deck is one of this year’s projects, dispose of oily rags properly. Oily rags stacked in a pile can lead to spontaneous combustion. Unfortunately, many families have lost their homes to fire. To keep you and your family safe please read the blog “House Fire Prevention: How To Store And Dispose of Oily Rags.”
9. Consider installing surge protectors. Let’s face it; even though we want to get away, electronics are a big part of our lives. Consider installing surge protectors on your outlets to keep your electronics safe from a power surge or lightning strike.
10. Consider installing a weather radio. During the summer months, weather can change significantly in a short period. A weather radio broadcasts both normal and emergency weather information. If severe weather is near your area, an audio alert is broadcast to inform you of the impending danger. This warning system is particularly useful at night when you and your family are sleeping. I’ll admit, the alert is startling at night, but it’s well worth it as I don’t usually hear the tornado sirens. Some radios also come with colored LED or strobe lights.
11. Take your neighbors a gift. If you have neighbors who have kept an eye on your property all winter, it is a nice idea to give them a gift to show your appreciation. They can be very impactful in stopping a theft or disaster during the off-season.
12. Create a home inventory. After you’ve completed your tasks and your cottage is open for the season, consider creating a home inventory. It’s likely each year the personal property at your cottage will change. If it was destroyed by fire or severe weather, would you remember every possession you had in it?

by Flagship Staff | May 1, 2018 | Blog
In just a few short weeks, college students will put on their caps and gowns and celebrate graduation. For many, graduation will be exciting and scary. Some graduates will start their new jobs right away while others will continue looking for their dream jobs.
Either way, graduation signifies the official start to adulthood. Full time jobs, as well as other responsibilities will become part of everyday life. For parents, it’s time to celebrate the fact that their college student is finally off the payroll!
With all the changes college graduates will experience, figuring out what they need for insurance coverage can be tricky.
If you or someone in your family is graduating from college, here is some information that may help.
Review your state’s auto insurance requirements. Many states mandate a minimum level of liability insurance on an auto insurance policy. Unfortunately, each state may be different and the minimum coverage may not provide you with adequate protection. Talk to an independent insurance agent to learn more about coverages and available limits.
To find your state’s minimum requirements click here.
If you live in Wisconsin, your auto insurance policy must provide the following minimum liability coverage. Again, higher limits may be needed to provide you with adequate protection.
• $25,000 for injury or death of one person;
• $50,000 for injury or death of two or more people; and
• $10,000 for property damage.
Don’t forget to buy renters insurance. Signing a lease for an apartment is the start to independence. However, don’t forget about renters insurance. Most property owner’s insurance covers only the building. Personal property coverage provides protection against loss to your items such as clothes, shoes, furniture, electronics, small appliances, sporting equipment, etc. Personal liability comes into play if your actions lead to someone else’s injury. Minimum liability limits start at $100,000 and provide coverage for medical tests, surgeries, prescriptions, and their time off work.
Understand health insurance options. Many employers provide health insurance plans. Talk to your employer about the plans they offer. If they don’t provide a good plan, current law allows children to stay on their parent’s plan until age 26. However, based on where you live, it may make sense to purchase your own policy through the insurance exchange. Visit www.healthcare.gov to learn more.
Take advantage of retirement plans early. If you just received your diploma, you might think it doesn’t make sense to invest your hard-earned money in a retirement plan. While I understand you have rent payments and grocery bills, I recommend you start investing right away. There’s never a good time to start investing. However, the earlier you start, the better off you’ll be.
by Flagship Staff | Apr 25, 2018 | Blog
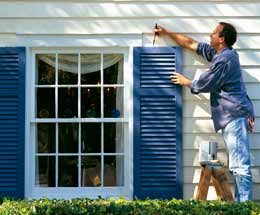
Depending on where you live, spring may have sprung. For some of us in the Midwest, we’re still waiting.
No matter where you live, weather can cause damage to your home. Bonnie Pesch, senior personal lines underwriter shares areas to examine on your home after a long, cold winter.
Windows: In the winter, windows ideally keep the cold air out and the warm air in, and in summer, they should do just the opposite. If your windows don’t do this, you’re probably wasting money on your heating/air conditioning bills.
To make sure your windows are doing their job, check that the caulking and weather stripping are still in good condition. If not, replace them. If there’s condensation on your window, either the glass or the window should be replaced. Faulty windows, as well as window trim that’s not maintained properly, can allow moisture into your home. That moisture can lead to mold and damaged dry wall.
Gutters: Gutters should direct water away from your home and help keep it out of your basement. It’s important, however, that the water NOT be directed over a walkway or driveway. If it freezes, it could create a liability exposure for you if someone slips or falls. Gutters expand and contract, depending on the temperature; they should be flush with the roof and not sag or dip.
Roof: Check for loose, missing, or cracked shingles. Are the shingles curling? What about nail-pops? These issues should be addressed to ensure water doesn’t get into your home. An aging roof can be a concern as shingles lose the ability to shed water as they age. Older shingles are also more prone to hail damage. If your roof is getting old, or you see even a small amount of deterioration, don’t wait too long! Over just one summer, sun exposure can increase the rate of the roof’s deterioration, and then before you know it winter in here. Don’t let that aging roof sit in the snow, ice, and rain, hoping no water gets into your home. What a mess it could be!
Foundations: Be sure to examine the foundation for any cracks that can allow water in. Sometimes just caulking cracks isn’t sufficient. Consider contacting a foundation specialist to assess your home.
Exterior Walls: Do you have water stains on your exterior walls? If so, this may be an indication that your gutters aren’t adequately containing rain water. Perhaps the gutters need to be cleaned or straightened. If you have wood siding, check for holes or openings that can allow ants, woodpeckers, or other critters to nest or burrow through. If the paint on your wood siding is peeling, you should properly scrape and re-paint the wood to protect it from the weather elements.
Chimneys: Mortar deterioration can lead to moisture. Repairing the mortar and replacing deteriorated bricks can be a DIY project, but if you’re not comfortable on the roof, call a professional. Also check the cap and screen to be sure they keep water from entering the flue inside the chimney. You should have your chimney/flue inspected and cleaned every year to make sure there are no cracks, deterioration, or debris blocking the hot air/smoke to escape. During the winter, we see a large number of home fires associated with chimneys.
Decks: You should check your deck periodically to be sure the posts are still solid, the deck boards haven’t rotted, and the railings aren’t wobbly. All of these create a liability exposure on your premises. What if someone would fall down the steps because the post or railing wasn’t maintained properly?
When everything is finished and in good condition, I suggest you plant some beautiful flowers, sit back on the deck, and watch your neighbors figure out what repairs they may need.
Page 18 of 35« First«...10...1617181920...30...»Last »
