
by Flagship Staff | Oct 14, 2020 | Blog
While there may not be as many kids in Halloween costumes roaming your neighborhood this year, it still may be possible for a scary visitor to show up on your front doorstep looking for a treat. While trick-or-treating has been a long-standing tradition for many, it does bring about some risk for homeowners.
Here are some things you should keep in mind this Halloween.
1. Be vigilant against an increase in property crime. Ghouls and goblins may not only be scouring your neighborhood for candy, they may also be looking for other things they can get their hands on, including wallets, purses, and other valuables. Theft and vandalism increase significantly during this time. If you’re handing out candy from your front door, make sure your garage is closed and locked. If you’re sitting in your driveway handing out candy, keep an eye on your property as well as your neighbors’ homes. If you notice anything suspicious, consider calling your local police.
2. Don’t forget to blow out the candles. As we approach the holiday season, lighting candles may be a part of your everyday routine. If you have children carving pumpkins, placing a candle inside may be a family tradition. However, when it’s time to call it a day, don’t forget to blow
them out. Or instead of using real candles, consider using battery-operated ones. Lastly, never leave candles unattended. A pet’s wagging tail or a small child could easily knock them over. For additional candle safety tips, click here.
A homeowners policy does provide coverage for fire damage. If you live in an apartment, it’s important to have a renters policy. Usually, the building is covered by the landlord’s policy. However, to get reimbursed for the loss of your personal belongings, you’ll need a renters policy.
3. Always keep your cars locked. Never keep valuables, especially your keys, in an unlocked car. Recently, our neighborhood experienced a series of thefts involving unlocked cars. Also, never keep your social security card in your wallet or purse. Keep it stored in your home, preferably in a safe with other important documents.
4. Take precautions with decorations. Halloween decorations have become more popular in many neighborhoods. Unfortunately, improper use and installation could lead to personal injury as well as property damage. Here are a couple of claims scenarios.
Claim Scenario 1
Darth Vader comes to your door with his good buddy Yoda and trips over an extension cord for your giant inflatable pumpkin in the front yard. Darth Vader and his light saber go flying. While Yoda tries to use the force to break his fall, he’s unsuccessful. Unfortunately, Darth Vader falls to the ground and breaks his arm. Because this is an accident on your property, you’d be responsible for his injuries. Fortunately, his injury would be covered by the personal liability coverage in your homeowners insurance policy.
Claim Scenario 2
This Halloween, your goal is to have the most decorations in your entire neighborhood. Extension cords are running everywhere, and your outlets are beyond their load capacity. As neighbors are enjoying your decorations, sparks begin to fly and your home catches on fire. Luckily, the fire is contained quickly, and you only experience $5,000 in property damage. Again, a homeowners policy will provide coverage for your damaged property.
5. Watch out for pedestrians. Excited kids looking to find their favorite candy may not necessarily think about safety and how to cross the street. As a driver, it’s up to you to stay alert and slow down if you’re going through a neighborhood during trick-or-treat hours. In addition, it would be wise to stay off your mobile device and focus strictly on driving.
6. Be on the lookout for vandals. Being dressed in a costume may give some the confidence to damage your property. When I was a kid, someone dumped oil on our porch as a prank. That was a huge mess for my parents to clean up. Watch for stolen decorations, eggs on your home or car, and toilet paper.
If something does happen, remember, before a claim payment can be made, you’re responsible for paying the deductible. If the items damaged or destroyed are less than your deductible, don’t file an insurance claim.
Lastly, on a regular basis review your insurance policy with your agent to make sure you have enough coverage to protect you all year round.
For additional safety tips, check out the blogs below.
Six tips to keep trick-or-treaters safe on Halloween
10 tips for your next trip to the pumpkin patch
Ten tips to enjoy Halloween and keep your pets safe
by Flagship Staff | Oct 7, 2020 | Blog
Have you ever used a new appliance and had the whole house experience a blackout? If you’ve been living in the same home for years, blackouts might be a regular occurrence.
For those who are in a rental contract, blackouts might also be common if you’re staying in an old house. So, what’s the deal with the annoying blackouts?
Well, there might be a problem with the electric panel, and you might need to upgrade it. In this article, we’ll discuss why you might need an electric panel upgrade and when you should do it.
Flickering Lights
Flickering lights are the first sign and reason you should upgrade your electric panel. If this isn’t scary enough for you, we’ll tell you why.
Flickering lights are a byproduct of faulty wiring. Other than problems with the lights, faulty wiring will cause a burnt smell and can even cause shocks when touching certain appliances, such as microwaves or laptops. You’ll also find scorch marks and sparks on power outlets or sockets in your home. Another thing to watch for is if your electric panel feels warm.
Tripping Circuit Breakers
You’ve installed a new air conditioner, and your circuit breakers trip each time you turn on the air conditioner. So, what’s the problem? Circuit breakers trip and shut off electrical flow because a circuit is overloaded.
The reality is electric panels need to be upgraded every 25-40 years. If your home is still using an old electric panel, it won’t be able to handle new appliances.
This is because an old electric panel doesn’t have the capacity to handle too much electricity.
These days, modern homes run on new and advanced appliances. With an ancient electric panel, your home may experience blackouts daily. When this happens, you know it’s time to upgrade your electric panel.
Power Strip Usage
Are you using more and more power strips to charge devices all over your home? Houses have limited wall sockets, however using a lot of power strips means you’re using more electricity than your electric panel can handle.
Twenty years ago, two or three wall sockets were enough for a home. These days, we need more sockets due to the overflowing demand of electricity.
If you have a bunch of extension cords and power strips all over the home, it’s definitely time to upgrade your electric panel. To learn more about the danger of power strips and some tips to protect your family and your home, click here.
Your Home Safety
Other than upgrading your home’s electricity capability, you’ll be doing your home a favor by ensuring that it’s safe to live in. By being prepared and making sure your electric panel is upgraded, your home will be safer from fires and other electrical disasters.
Also, investing in an electric panel upgrade can increase your home’s value. For those who are planning to move, upgrading your electric panel will be a selling point for potential buyers, because they won’t need to upgrade it.
If you’re unsure whether your home needs an electric panel upgrade, you can hire a professional to inspect it. They can also help you figure out what steps you need to take to make sure your electric panel is in good shape. They might suggest you change the wires or upgrade the entire panel. Either way, it’ll be a good investment for your home.

by Flagship Staff | Sep 29, 2020 | Blog
A beautiful in-ground pool can create hours of fun with family and friends. It’s critically important, however, to properly winterize the pool to avoid damage and costly repairs, and even to prevent a claim against your homeowner’s insurance.
Protective automatic covers have become increasingly popular. They offer great benefits because they’re easy to open and close on an automated track, they keep the water heated, and they prevent debris, animals, or children from getting into the pool. But if the pool isn’t properly winterized, the weight of water, ice, or snow on the cover can cause costly damage.
Once the temperature consistently drops to 65 degrees and below, it’s time to winterize the pool for protection. Here are some steps you should follow.
1. The pool should be thoroughly cleaned, including skimming all debris, vacuuming, brushing the bottom and all sides, and balancing all chemicals.
2. Clean, back wash, and drain the filter and pump of all debris and water and blow out all water lines. This will help you avoid any damage to these costly pieces of equipment that can be caused by freezing.
3. Drain the water three to six inches below the skimmer and jets so no water can enter and cause freezing damage. Finally, add winterizing chemicals to the water as this will deter freezing and stop algae growth during those months the pool is covered and not in use. You may wish to consider hiring a local pool maintenance company to do the full winterizing process to best protect your investment.
The water level of your pool is the most important fact to consider when protecting it during the cold-weather months. Keeping water in a pool over the winter helps keep the liner clean, thus avoiding damage from debris. It also evens the weight pressure on the walls and prevents them from bowing or collapsing during expansion/contraction. When an automatic cover is in place for extended periods of time, it’s critical to make sure the water level remains adequate. A slow leak or too much evaporation that decreases the water level can cause collapse as the season continues.
Water and ice that accumulates on top of the cover can be thawed and pumped off with special equipment to avoid that weight on the cover, as well as the drowning hazard it can create. Because it’s more frequent, however, snow can be more difficult to remove. Long-handled brooms made of the proper material or a hand-held blower can be used to sweep or blow lighter snow off the cover. It’s important to do this after every snowfall because it can build up and become difficult to remove. There are special waterproof heating cables and pool salt (NOT rock salt used on driveways or sidewalks) that can help melt the snow so it can then be pumped off. Most automatic covers have an approximate 400-pound weight limit but just one cubic foot of snow weighs 20 pounds so the weight on an entire pool cover can add up quickly. If large amounts of water, snow, or ice aren’t removed, it can cause the cover to sag inward. Depending on the water level, the cover can collapse with such pressure that it pulls the entire side of pool and tracking system away. This can cause $50,000 or more in repairs, and in many areas, pool contractors who can service this type of damage are limited.
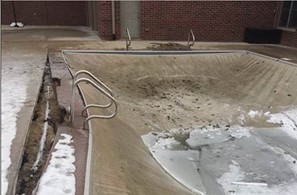
Damaged pool
In the Midwest, where Mother Nature sends heavier amounts of rain, ice, and snow, it’s highly recommended to retract an automatic cover and purchase a winter safety cover with built-in spring tension and drainage features to better handle the fluctuating weight in the off-season.
Properly winterizing your pool will help you avoid costly damage and lengthy repairs that can delay your fun next swimming season. Take the time to work with a local pool company to ensure it’s winterized properly, keeping your pool beautiful and functional for many years to come.

by Flagship Staff | Sep 22, 2020 | Blog
If you’re growing mold and mildew on your home’s siding, now’s a good time to clean it. If you’ve never done this before, you may not know where to start. Depending on the size of your home and the amount of debris on it, a simple garden house may not provide you with much help. A pressure washer and a scrub brush will do the trick.
Before you start pressuring washing your home, there are some things to know.
Types of Pressure Washers
There are different types of pressure washers available. What you’ll use it for will help determine which one is right for you.
My first pressure washer was one I ordered from a TV shopping network. It was an electric one and seemed like a good deal at the time. Electric power washers are wallet friendly and portable making them easy to move around your home. The downside to them is they’re not as powerful.
Gas pressure washers are more powerful but are more expensive. With proper maintenance, they tend to last longer. Gas pressure washers can be used for tougher, larger jobs.
What are PSI and GPM?
Not all power washers are created equal. You’ll need to understand pounds per square inch (PSI) and gallons per minute (GPM) to select the right pressure washer for the job. PSI is the amount of cleaning power or force produced by the machine. GPM is how much water will go through the machine. To compare different power washers and to find the right one for you, multiply PSI by GPM or refer to the table below.
| Performance Type |
PSI |
GPM |
Job Type |
| Light-Duty |
1,300-1,900 |
2 |
Washing patio furniture, grills, and vehicles |
| Medium-Duty |
2,000-2,800 |
2-3 |
Cleaning exterior siding, fences, sidewalks, and driveways |
| Heavy-Duty |
2,800 |
3-4 |
Completing large-scale cleaning projects |
| Extra Heavy-Duty |
3,100 |
3-4 |
Stripping paint, removing graffiti, and washing two-story homes |
Pressure Washing Tips
- Be smart and safe. Wear proper eye and ear protection when working on your project. Always make sure you’re on stable to ground to prevent slip and falls. Never stand on a ladder.
- Use tarps. Cover your plants, flowers, and other personal belongings to prevent damage.
- Never point the spray gun at pets or people. I know it may be tempting and seem like fun to spray your spouse or sibling, but the spray gun isn’t a squirt gun. The high-pressure spray can cause significant bodily injury.
- Turn it off. If you need to leave the job for any reason, turn off the pressure washer. You don’t want a small child or inexperienced person wielding the spray gun.
- Select the correct nozzle for the job. Depending on your job, a different nozzle or tip may be needed. Nozzles/tips are made to draw the detergent out or to provide a high-pressure rinse. Some manufactures will color code the tips which signify varying angles. If yours has this, refer to your owner’s manual for more information.
- Use appropriate chemicals. Only use approved chemicals or cleaning agents. Using the wrong one could damage your pressure washer and be harmful to the environment.
- Develop a cleaning plan. Determine what you want to clean and if it’s safe to be cleaned with a pressure washer before starting. Otherwise, you may get ambitious and clean things that shouldn’t be, resulting in damage.
- Maintain an appropriate distance. Spraying too close to an object can cause damage. Maintain a distance of at least four to six feet.

by Flagship Staff | Sep 15, 2020 | Blog
Planting a tree in your yard can be beneficial to your family. Not only do trees provide beauty, they offer many additional benefits such as:
- Cleaning the air we breath
- Increasing your home’s value
- Providing shelter for birds and other animals
- Preventing soil erosion
- Reducing rainwater runoff
- Helping reduce stress and anxiety
While severe weather can bring down trees, causing property damage, it’s important to realize there are other reasons a tree or branch may fall. Reasons include insect infestations, old age, poor soil conditions, malnutrition, and flooding.
Signs your tree could fall
There’s no way to tell exactly when or if your tree is going to fall. However, there are some things to watch for.
- Leaning tower of Pisa. There are several trees in my neighborhood that are leaning. However, at this point they’re smaller and of no concern. If you have large trees in your yard that have a significant lean, it may be time to contact a professional to discuss their removal. Tree lean can be caused by wind or root damage.
- Inadequate nutrients. If you notice dead or falling branches, it may be the result of a lack of nutrients. Thoroughly inspect your tree(s). If the branches are low and small, you may be able to remove them yourself. If not, contact a professional for assistance.
- Falling leaves. Leaves can fall from your tree(s) for a variety of reasons such as:
- Disease
- Too much or too little water
- Canopy crowding
If fallen leaves are green, your tree is probably fine. If the leaves are discolored or look sick, there may be an issue. In addition, if the leaves are falling from the outside in there may be a root issue. Lastly, some diseases or pests can attack the tree and destroy it over time which can weaken the tree and pose a threat to your family.
- Proximity to water. Living on a waterfront is a dream of many. However, watch out for trees that are close to the water. Excessive water can cause the roots to become waterlogged. Over time, this can cause them to decay and decrease structural stability.
- Cracks in the trunk. It’s normal for trees to have cracks or holes. If they’re large, it’s important to have them examined to see how extensive they are. They could be a sign of a diseased tree and again, the structural integrity can be compromised.
Tips for maintaining healthy trees
- Proper mulch. Mulch can help retain moisture which is good for the tree’s root system. It also keeps the soil cool and can prevent weeds from growing.
- Adequate water. Newly planted trees need to be watered regularly. Mature trees need to be watered during times of drought. Set your hose at the base of the tree and let your water flow at a slow trickle for 20-30 minutes.
- Proper pruning can improve the strength and structure of your trees. However, it’s important to make the proper cuts at the correct time of the year. To learn more, click here.
- Watch for unwanted insects. Insects such as Japanese beetles, Adelgids, and caterpillars can invade your trees without you knowing. These pests can cause serious damage, including weakening the tree. If your tree is small, you may be able to spray an insecticide on it. If it’s too big, you may be able to use a granular powder that not only provides nutrients but also prevents insects. If in doubt, contact your local tree professional for assistance.
If your trees are not properly maintained, there may not be coverage on your homeowners policy.
Claims Scenarios
A common claim scenario that insureds deal with after a storm is fallen trees. High winds and saturated ground can create the perfect storm. Most standard homeowners policies provide some coverage.
Claim Scenario 1
A tornado rolls through the outskirts of your city. While your house wasn’t directly hit by it, tree branches flew through the air, breaking windows and damaging your siding. Even though your trees survived and didn’t cause this damage, a standard homeowners policy would provide property damage coverage.
Claim Scenario 2
As you’re enjoying a nice summer day on your patio, you notice dark clouds approaching. As the trees begin to sway, you decide to take shelter indoors. After the storm passes, you survey the damage and find a downed tree and damaged shrubs. As a result, you contact your independent insurance agent to see if you have coverage. A standard homeowners policy could provide coverage for up to $500 for the removal of any one tree and up to $1,000 for any one loss. Unless stated differently in the policy, your homeowners deductible would apply to this type of loss.
Claim Scenario 3
As you’re preparing dinner, a severe summer storm passes through. You hear a loud noise and notice the neighbor’s tree has fallen on your property. After further inspection, you realize the tree has crashed down on your roof causing significant damage. In this scenario, not only are you responsible for the cleanup, you’d have to contact your independent agent to see if coverage is available for the damage your home sustained.
If you can prove the neighbor’s tree was dead, diseased, or not properly maintained, your neighbor could be responsible for your property damage due to negligence.
Claim Scenario 4
After a trip to the grocery store, you arrive home and leave your car parked in the driveway. Suddenly, a severe summer storm blows into your neighborhood. High winds cause large trees surrounding your home to fall on your roof and your car, causing significant damage. In this scenario, a standard homeowners policy covers damage caused by a fallen tree if the cause of loss (peril) is wind. To have coverage for your car, you must have an auto policy with comprehensive insurance coverage.
