by Flagship Staff | Jan 6, 2021 | Blog
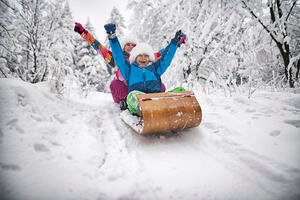
Sledding with friends and family is a great way to enjoy the outdoors. Not to mention, walking up the hill after an exhilarating ride down is a way to get some exercise during winter. However, if you’re not careful, sledding can cause serious injuries. Most injuries are a result of colliding with objects or other people.
Many years ago, on winter break, I took my daughter sledding. We jumped onto our tube and down the hill we went. It was fast and we were having so much fun. What I didn’t realize at the time is how fast it can turn into a scary situation. On one of our runs down, we hit a large bump which sent us tumbling. As it was happening, everything seemed to be in slow motion. Next to me, my daughter was tumbling head over heels like a rag doll. At the end of the tumble, we lay there a bit dazed and confused. Luckily, we were both ok. Unfortunately, it put an end to our fun day. On occasion my daughter still mentions it.
Here are some sledding injury statistics:
- Each year, approximately 20,000 children are injured and require medical care.
- Head injuries are the most common.
- Children 14 and younger are the ones most likely to be injured.
- Sleds can reach speeds of up to 25 miles per hour.
To keep your family safe, check out the safety tips below:
1. Go with your kids. If you have a hill near your house, you may be tempted to send them on their way. I’d recommend going with them. Even if you don’t sled, you can keep an eye on potentially harmful things that they’re not aware of. And in the event of an injury, you’ll be there to help. If you have kids who are five or younger, it’s recommended you sled with them.
2. Pick the perfect hill. As a kid, I remember sledding on just about any hill I could find. As a parent, I now realize the importance of checking out the hill ahead of time. Avoid sledding in areas with trees, fences, poles, or rocks. Remember, kids feel invincible and are looking for a thrill. They’re not paying attention to the hazards that could cause injuries. Also, avoid hills that are near streets or busy parking lots.
3. Consider visiting a ski hill. Some ski hills offer tubing lanes for those seeking speed and family fun. There are many benefits to tubing at a local ski hill such as:
- The tube lanes are designed for safety.
- Shelters can provide a place to warm up or rest.
- Beverages and food are available.
- Staff is available to assist with minor injuries.
- There are lights for tubing at night.
- There may be a track or lift system for taking you up to the starting point.
4. Invest in a good sled. Tubes and saucers are popular choices for many. They’re affordable and readily available. However, spending money on a sled that has steering and braking capabilities is a better option. Back in the day, my brother and I had sleds with these capabilities. Not only did we feel cool, they also kept us safe. We were able to steer around dangerous objects and avoid other sledders. In addition, we could slow our speed to stop quickly. Don’t forget to check the recommended age on the package before buying.
5. Talk to your kids about safety. Here are some guidelines to discuss before you go:
- Never go down the hill headfirst.
- Never go down a hill backwards or while standing.
- Avoid building a jump or ramp.
- Always keep arms and legs inside the sled.
- Walk up the side of the hill to avoid being struck by other sledders.
6. Buy your kids helmets. A winter sports helmet is a wise investment and can be used for many outdoor activities. Consider wearing one yourself if you plan on sledding with them.
7. Wear appropriate winter clothing. If you have a teenager who’s going sledding, more than likely they’re not dressed appropriately for winter conditions. Make sure your family wears hats, gloves/mittens, snow pants, boots, and winter jackets. In addition, moisture wicking clothing can help keep them warm and dry. Lastly, avoid wearing scarves and other loose clothing that can get caught.
8. Stay hydrated. Staying hydrated during winter activities is very important. Dehydration can happen quickly in cold weather because your body is working hard to stay warm. Check out “8 Tips for Hydrating in Cold Weather.”
by Flagship Staff | Dec 22, 2020 | Blog
Unfortunately, every year when the first snowfall arrives, it’s common to see cars sliding through intersections or into ditches. It seems like that first snowfall catches many drivers off guard. If this is your first winter with a teen driver, it may be even more stressful. Winter driving requires patience and skill. To acquire the appropriate skill necessary to stay safe, it takes practice.
This blog will discuss:
- Winter driving facts
- Common winter accidents and insurance
- Ways to keep your teen drivers safe
Winter Driving Facts and Stats
- Seventeen percent of all vehicle crashes occur during snowy conditions.
- Approximately 70% of U.S. roads are in areas that receive annual snowfall.
- Each year, approximately 116,000 people are injured on snowy or icy roads.
- Stopping your car on snow and ice can take 6 to 10 times longer.
In heavy snow, freeway speeds should be reduced by as much as 40%.
- Four-wheel and all-wheel drive vehicles don’t stop quicker than other vehicles.
Winter car accidents and insurance
Poor road conditions have a major impact on how your car handles. Add poor visibility, and winter driving can be extremely dangerous. If your teen driver damages your car or another person’s property, it’s important to make sure you have the right insurance coverage and adequate limits to pay for damages.
If your teen slides through an intersection or into a ditch, here’s how different types of insurance coverage may apply.
- Auto Liability insurance covers injury or property damage caused to a third-party.
- Collision insurance provides coverage for damage to your teen’s car.
- Medical payments or Personal Injury Protection (PIP) provides coverage for injuries sustained by anyone in the car driven by your teen.
- Towing coverage may be provided through your insurance policy. If it’s not, I‘d recommend adding it. The benefit of this coverage is that no money needs to be paid to the towing company at the time of the accident.
Ways to keep your teen drivers safe
To help your teens excel and stay safe driving this winter, enrolling them in a winter driving school may be just what they need. Road America’s Winter Driving School sponsored by West Bend allows teen drivers to practice winter driving in a safe environment.
The instructors at Road America teach techniques for handling different winter driving conditions. Those techniques include:
- Skid control and prevention
- Braking with ABS and without
- Collision avoidance maneuvers
- Proper vision skills
If you don’t have a winter driving school near you, make sure you talk to your teen about winter driving or check out the helpful videos below.
Tips for Safe Winter Driving – Winter Driving Hazards & Cornering Overview
Tips for Safe Driving – Winter Braking ABS
Essential Winter Driving Tips – Consumer Reports
Winter Driving Tips You Need to Know
Everything You Need to Know About Driving In The Snow
Do you have any tips you’d like to share? I’d love to hear them. Please share them in the box below.
Source:
https://www.highways.org/wp-content/uploads/2014/02/Brochure-FINAL-LoRes.pdf
https://driving-tests.org/driving-statistics/
Topics: Teen Safety, Weather
by Flagship Staff | Dec 8, 2020 | Blog
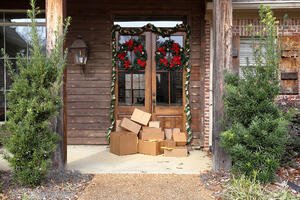
With the COVID-19 pandemic, online shopping has increased significantly. UPS, Fed EX, and Amazon trucks are constantly driving through my neighborhood. With holiday shopping, it’s getting even busier.
While online shopping does provide convenience, boxes left outside your front door can be stolen. Now more than ever, thieves may be watching your neighborhood for packages.
If you’re looking to protect your packages this holiday season, here are some tips for you.
1. Check into locker systems. Amazon and delivery services like UPS, Fed Ex, and the United States Postal Service (USPS) have their own unique locker systems. They’re in department stores, convenience stores, gyms, pharmacies, and other types of businesses that want to participate. When I did a search for my area, I was amazed at the number of locations available. Once your package is delivered, special instructions will be sent to you on how to access the locker.
In addition, the Amazon Hub Counter uses local businesses that can serve as a drop-off point. Then at your convenience, you can pick up your package during their hours of operation.
2. Install a video doorbell. Before I moved into our new home, I didn’t understand the benefits of a video doorbell. As part of our new home security package, I had one installed. I absolutely love it. Every time there’s activity at the front door, I get a notification on my smart phone and watch. Since many packages are currently being delivered to our home, I can have my daughter get them off the porch quickly. In addition to the notification, it takes a short video every time there’s motion. While it encourages funny behaviors from my family and friends, it could come in handy if I ever needed to review the footage.
3.Install an outdoor security camera. An outdoor camera provides more protection than a video doorbell because it can monitor a larger area. In addition, live streams and alerts can help you identify unusual activity at your home. Lastly, just their physical presence can help deter a would-be burglar.
Like all products, security cameras have many different features. Features include:
- Two-way audio
- Night vision
- An easy-to-use app
- Degrees of mobility
Make sure you identify what’s important to you before buying one.
4. Update your mailbox. If you have a regular mailbox, now may be the time to upgrade to one that can be used to secure your packages. Based on your needs for the box, there are several companies that provide a variety of options. No matter what you select, make sure they’re approved by the USPS.
5. Give Key by Amazon a try. This service by Amazon allows packages to be delivered inside your garage, home, or car. Package protection, contactless delivery, and optional camera integration are just a few of the benefits to this service.
6. Insure your holiday packages. Because package thefts increase around the holidays, it may be wise to insure your packages this time of year. Then if your package is stolen, you can be reimbursed for your loss.
7. Give curbside pickup a try. Many stores now offer curbside pickup. This is a nice way to keep packages off your porch, especially if the items are expensive. Once your package is ready for pickup, you’ll be notified. A courteous associate will put your package right in your trunk.
Do you have any tips you’d like to share? I’d love to hear them. Please share them in the box below.
Topics: Holiday Safety, Home Safety
by Flagship Staff | Dec 2, 2020 | Blog
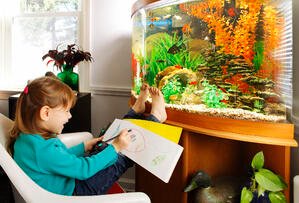
Kids love having their very own pet fish to care for, and betta fish are a popular, easy-care choice. But for your family’s new pet to stay healthy and thriving, you must get the aquarium setup process correct.
In this blog, you’ll learn how to safely set up a tank for your betta and more.
1. Assemble What You Need
Start by gathering everything you’ll need for your aquarium:
- Sand/gravel substrate
- Lighting unit
- Filtration system
- Heater
- Aquarium thermometer
- Decorations
- Plants
Note smaller tanks often come as starter kits that include everything you’ll need to get up and running, which can be the most cost-effective way to go.
2. Prepare the Aquarium
Even a tank that’s fresh out of the box will most likely be dusty. Take a clean, damp cloth and wipe the inside of the aquarium to remove dust and debris. Never use detergent or glass cleaner inside the tank, as residue could poison your fish.
3. Safely Position Your Aquarium
Now, decide where you’re going to keep your tank.
Make sure you use a proper aquarium stand that’s designed to take the weight of a fish tank and its contents, or choose a sturdy countertop or desk for a smaller aquarium. The tank needs to be level to avoid placing stress on the seals, preventing leaks or cracks.
Place the tank close to a power supply so you can plug in your filter, lights, and heater. The aquarium needs to be situated away from heat sources, drafts, and direct sunlight so that your fish don’t suffer temperature shock.
Always keep the tank away from doorways and open areas where running kids or pets could bump into it, or a carelessly opened door could damage the aquarium.
4. Prepare the Substrate
Wash the gravel substrate under running water to remove dust. When the gravel is clean, add it to the aquarium to a depth of approximately two inches.
5. Install the Filter And Heater
Now, fit the filter system and heater, but don’t turn them on yet.
6. Fill the Tank with Water
Place a saucer or upturned bowl on the surface of the gravel. Fill the aquarium with tap water, directing the flow over the saucer so that the gravel isn’t displaced. Leave an inch or so below the fill line to allow for the water displacement that’ll happen when decorations and plants are added.
Don’t add a water conditioner to the water. Tap water contains ammonia, which your biological filter needs to start the nitrogen cycle.
7. Add Decorations
Rinse your tank decorations to remove dust and place them in the aquarium.
8. Add Plants
Living plants make a great addition to any freshwater fish tank, keeping the water clean and providing shelter for your fish.
Trim away dead leaves and broken stems, as per the supplier’s instructions, before adding the plants to your tank. Leave plenty of space between the plants so they’ll have room to grow.
9. Switch ON the Filter And Heater
Switch on the heater and filtration system. Adjust the heater to the water temperature recommended for your fish and plants.
You’ll need to allow the aquarium to cycle for ten days or so before you can safely add your fish. Use an aquarium water testing kit to check the levels of ammonia, nitrites, and nitrates during that time. When ammonia and nitrite levels are zero and nitrates are at or below 20 parts per million (PPM), you can introduce your fish.
If you’re building a community tank, I recommend you start with just a few fish, and allow the biological filter to mature for a couple of weeks before adding more livestock to your collection. Of course, if you want a single betta fish, go right ahead and bring him home!
10. Set Aquarium Lighting
Fish don’t need lights at all! In fact, too much light is very stressful for fish. However, living plants do need light for photosynthesis. So, if you’ve planted your tank, you’ll need to give the plants eight to ten hours of light every day to mimic daytime and nighttime.
Some lighting units have built-in timers you can set. However, a standard light timer from your local hardware shop works just as well.
11. Maintenance
Once your tank is set up, you’ll need to maintain it. I recommend changing around 25% of the water every week and rinsing the filter media in tank water once a month to keep it clean and fresh. Clean the substrate with an aquarium gravel vacuum to get rid of fish waste, leftover food, and plant debris.
Final Thoughts
So, now you know how to safely set up an aquarium!
Before buying a tank, always research the needs of the fish species you want to keep and set the tank up accordingly. Once your aquarium is established, be sure to keep it well-maintained, and you can look forward to enjoying happy, healthy fish for many years to come.
by Flagship Staff | Nov 24, 2020 | Blog
Buying your first snow blower can be overwhelming. There are many models to choose from all with varying features. To make your decision easier, consider the size of your property, yearly average snowfall, and price.
Having lived on a corner lot with a fire hydrant and a long sidewalk, I’ve spent a significant amount of time snow blowing. If you strictly focus on price, you may buy a snow blower that’s inadequate for the job at hand or isn’t reliable. Make sure you find the right balance before buying.
Types of snow blowers
- An electric snow blower. Is recommended for smaller properties. It can work well for removing snow from patios, walkways, and other paved surfaces. It’s a nice option for areas that receive light snow.
- A cordless snow blower. Runs on a high-voltage battery. It’s a light unit that can handle various types of snowfall on smaller properties and there are no maintenance costs. Cordless and electric snow blowers are less expensive and are nice alternatives if you don’t want to shovel.
- Single-stage. This type of snow blower is nimble and uses a high-speed auger that scrapes the snow off your driveway or sidewalk and launches it through the air. While it’s served me well, there were many times I could’ve used a two-stage snow blower. The bottom of the driveway was often difficult to clean after the snowplow went through and left heavy snow and hard ice chunks. This type of snow blower is best served for light to moderate snowfall and for small-to-medium-sized properties. If you have a gravel driveway, this type of snow blower shouldn’t be used as it’ll scrape off the stones and shoot them in the direction of the chute. This could cause property damage or injury. Lastly, over time the auger will wear out and need replacing. When your snow blower stops throwing snow efficiently, you’ll know it’s time to replace the auger.
- Two-stage. This type of snow blower is more powerful than a single-stage. It’s self-propelled, so you’ll be able to get through a lot of snow and ice without stopping and starting. Also, because this snow blower doesn’t scrape the ground, it can be used on gravel driveways. The downside to this snow blower is that it’s heavier, bigger, and not as nimble. Because it removes large amounts of snow, it’s recommended for properties that have larger, longer driveways and for climates that receive significant snowfall each year.
- Three-stage. This type of snow blower is the strongest and toughest. It can clear over 20 inches of wet, heavy snow and chop up the ice chunks like nothing. While these machines are expensive, if you live in a climate that receives a lot of heavy snowfalls, this one is for you.
Features and attachments
Once you’ve identified the type of snow blower you need to remove snow from your property, it’s then time to look at some of the features offered. Depending on what features you select, it could make your job even easier. If you’re like me, the quicker you can get back in the warm house the better!
Here’s a list of features that can be found on the different types of snow blowers.
- Electric start. Instead of pulling on a cord numerous times, simply plug it in and push the start button.
- Skid shoes. Skid shoes protect your concrete from damage as the unit goes across your driveway or sidewalk. They also eliminate the annoying rust stains that appear on your garage floor because of melting snow.
- Speed controls. Allow you to operate the snow blower at a pace that’s comfortable for you.
- Power steering. A heavy snow blower trying to cut through a lot of snow can be difficult to maneuver. Power steering allows you to turn it with ease.
- Remote or joystick operated chute. I don’t have this feature on my snow blower but would highly recommend it. I constantly must manually adjust the chute. As winter wears on, this becomes frustrating.
- Headlight. Improves visibility for you as well as cars that may be driving by.
- Heated handles. In my opinion, this is another must have. Keeping your hands and fingers warm can prevent frostbite.
Safety Tips
- Plan ahead. Think about snow placement before you start. This can help prevent extra work.
- Don’t wear loose clothing. Loose clothing can get caught in moving parts very easily and quickly. While a scarf can help keep you warm, it’s not worth the risk.
- Never operate while impaired. Operating while impaired can dull your senses and cause unintentional injuries.
- Wear appropriate safety gear. As a kid, I never thought about safety gear. Now, I wear ski googles to protect my eyes and ear plugs. Injuries can happen quickly and when you least expect it. Taking a few extra minutes to put on safety gear is worth it.
- Wear appropriate cold weather gear. While I would love to wear shorts and flip flops all year, it’s just not possible while living in the Midwest. Warm boots and mittens/gloves are important to keeping our extremities warm and preventing frostbite. In addition, moisture-wicking technology in clothing can help prevent you from feeling cold and uncomfortable.
- Don’t shoot snow at others. As kids, we did this all the time. We’d line up and wait to get pummeled with snow. We never thought about debris shooting out of the snow blower causing injury. My single-stage snow blower shoots debris very forcefully. An ice chunk or stone could be deadly.
- Never use your hands to unclog the chute or auger. Every year people suffer serious injuries to their fingers or hands. Before clearing out a snow clog, always turn the machine off and use the plastic cleaning tool that’s attached to it. If you don’t have one, use a wooden handle from a broom or shovel.
- Watch for cars and pedestrians. Always be alert to what’s going on around you. Neighbors walking their dogs or pulling kids in sleds is common after a snowfall. The last thing you want to do is cause injury to them. Also, if you must step into the street, watch for passing cars as well as snowplows. Fresh snow causes significant changes to driving conditions.
Lastly, if you intend on buying a snow blower this year, it’s a good idea to buy one before the first snow. This will ensure there are many options to choose from. Once the snow starts flying, there may be a rush on them leaving you out in the cold.
Do you have any tips you’d like to share? I’d love to hear them. Please share them in the box below.
Source:
https://www.lowes.com/n/buying-guide/snow-blower-buying-guide
Topics: Yard Safety
