
by Flagship Staff | Feb 3, 2021 | Blog
Have you ever come home to the sound of running water or wet floors? If so, you know this can cause a frantic situation. What you do next can make the problem better or worse.
Extreme cold temperatures can cause the water in your pipes to freeze leading to significant damage. Below are some things to watch for as well tips for dealing with frozen pipes.
Frozen pipe warning signs
Before a pipe bursts due to freezing there are some signs to watch for. Awareness can help prevent serious damage from occurring.
- No running water. Water plays a significant role in our daily lives. If you turn on the faucet for a glass of water or jump in the shower and no water comes out, you may have a problem. Another sign is significantly low water pressure.
- The pipes are frosty. There are pipes running in all different directions in your home, so it’s hard to see them all. However, keeping an eye on pipes that are under your sinks can help prevent damage. If those pipes have frost on them, this is a tell-tale sign that you have a problem.
- Unusual odors. If you smell a bad or unusual odor coming from a faucet or drain, this may be another warning sign that your pipes are frozen.
- Cold water. If you turn on the hot water, but only cold water comes out, that’s also a sign your pipes are frozen. If your pipes aren’t frozen, there may be a problem with your water heater.
What to do when a frozen pipe bursts
- Find your main water supply shut-off valve. No matter what the problem, the key to stopping a water leak is to turn off the water to your entire home. To do this, you’ll need to find your shut-off valve. To help you find this more quickly, attaching a shut off tag is a good idea. To get one for your home click here.
- Clean up the water right away. If your home has standing water from a burst pipe, cleaning up the water as soon as possible can help prevent further damage. If water sits for a long period of time, there’s a good chance for mold growth.
- Remove your personal items. Depending on where the water leak occurs, you may have to quickly remove items from that area. Quickly prioritize what items to remove based on value or sentiment. While many items can be replaced, family heirlooms or pictures can’t.
- Call your local plumber. An experienced plumber is trained to find, fix, and replace burst pipes timely. This isn’t the time to try and do it yourself.
- Call your local electrician. Based on how your home is built, it’s possible your circuit breaker box is near water lines. If water damage occurs, call your local electrician to identify and assist in the repairs.
- Contact your insurance agent. While an insurance policy can provide coverage for this type of damage, it’s important to talk to your independent insurance agent to determine the type of coverage you’ve purchased. Not every policy covers everything. Depending on the amount of damage, your insurance company may call in a local restoration company to help. This happened to me, and the restoration company did a fantastic job prioritizing and saving things important to us. In addition, they were able to save our carpet and drywall because they arrived quickly with the necessary equipment.
Preventing your pipes from freezing
- Drain your outdoor hose. Always drain water from outdoor hoses when the weather starts to get cold.
- Turn off your outdoor spigot’s shut-off valve. While new homes may have freeze resistant water spigots, it’s still a good idea to find the valve in your basement and turn it off.
- Add insulation. If water pipes are in an unheated part of your basement or garage, consider adding insulation to prevent them from freezing.
- Keep your heat on. Never let your home get below 55 degrees Fahrenheit during the winter months. If you’re going to escape the cold by going to a warm climate for a couple of months, consider installing a monitoring system. This type of system will send you a warning if your home goes below a specified temperature. You can then respond by having your neighbor or a family member inspect your home.
Do you have any tips or information you’d like to share? I’d love to hear them; please share them in the box below.
Topics: Home Safety, Weather
by Flagship Staff | Jan 28, 2021 | Blog
If you’re making home improvements this winter, you may want to consider adding a smart thermostat to your list. While smart thermostats may not be for everyone, they do offer many benefits. The number one benefit is savings on your heating and cooling expenses. Some smart thermostats can save as much as 20% each year.
Tips for buying a smart thermostat
To get started, all you need in your home is a Wi-Fi network. When it’s time to buy a smart thermostat, here are some things to consider:
- Your budget
- HVAC system compatibility
- Wires needed for the connection
- The features important to you
Smart thermostat benefits
1. Affordably priced. If you’re ready to change out your old thermostat, there are many reasonably priced options available. Determining which features are necessary for your home will help you find the right one. Check out this recent article to learn more.
2. Mobile device access. Like many other smart household items, you can access your system through your mobile device. This access will allow you to adjust your home’s temperature while at home or away.
3. Easy to use. Apps that are paired with your thermostat make it simple to set up a program or change it while on the go.
4. Learns your habits. Some thermostats include sensors that can gather additional information. These sensors can tell when a room is occupied or when your family is active. In addition, geofencing can tell your system that you’re on your way home. By collecting all this information, your thermostat will help your heating system run at top efficiency all while keeping you nice and warm.
5. Easy to read. My programable thermostat is bit difficult to read. If I want to change my program, it calls for me to put on my glasses. Smart thermostats use large numbers and simple screen displays which allow you to see what’s going on in your home from a distance.
6. Data analytics. Some thermostats can provide you with analytics. Information may include:
- Problems with your furnace
- Energy usage
- Energy usage patterns
- How much energy you saved
- Reasons why you saved energy
Installation tips
Smart thermostats can be added to just about any HVAC system. If you’re an experienced ”do-it-yourselfer,” you shouldn’t have any problems. If you’re not, you may want to call an electrician for assistance. Here are some simple tips that may help you with installation.
1. Read the directions. When you buy something new, the last thing you may want to do is read the directions. However, reading the directions prior to installation can increase efficiency and safety.
2. Gather the necessary tools. Understanding what tools are required and gathering them ahead of time can lead to increased efficiency. Turn off your HVAC system.
3. Turn off your system Turn off your system using the switch on the side of the unit or the breaker in your circuit box.
4. A picture is worth 1,000 words. Take a picture of the wiring before disconnecting. This can serve as a guide for setting up the new one. In addition, if something goes wrong with the smart thermostat, your old one can serve as a backup.
Do you have any tips you’d like to share? I’d love to hear your thoughts; please share them in the box below.
Source:
https://robotsinmyhome.com/learn-more/how-to-read-your-nest-or-ecobee-smart-thermostat-energy-report/#:~:text=The%20data%20is%20crunched%20and,depth%20energy%20report%20every%20month.
Topics: Home Safety
by Flagship Staff | Jan 20, 2021 | Blog
Winter provides a variety of fun activities to enjoy with your family and friends. However, winter also causes some challenges. One of them may be dryness in your home. Because there’s less moisture in the air, your family may experience some discomforts such as chapped lips, dry skin, scratchy throats, and nose irritation. If you have pets, they may experience static electricity when you pet them. If this is the case, you may benefit from running a humidifier in your home during the winter months.
Types of humidifiers
There are a variety of humidifiers that may work for your home. The list below identifies options from most to least expensive.
- Central humidifiers. While this is the most expensive type, the benefit is it provides moisture in your entire home. Central humidifiers hook up to your air conditioning or heating system. The remaining humidifiers only work for one room in your home.
- Evaporators. These larger, free-standing units can resemble an oscillating fan or portable heater.
- Steam vaporizers. This is what my mom used when we were sick. I can still picture it and hear the sound it made. Since the vaporizer creates steam by heating the water, it can cause burns if it spills, so be especially careful if you have small children.
- Ultrasonic humidifiers. These use an ultrasonic vibration to create a cool or warm mist.
Proper humidity level
Now that you understand the different types of humidifiers available, it’s important to know the ideal humidity level for your home. A level too high or low could cause problems. Experts recommend a relative humidity level between 30 – 50 percent. To keep your home at the proper level you’ll need to buy a hygrometer, which measures temperature and relative humidity. I recently bought one for $10.00 and I’m happy with its performance. When my humidity level is perfect it shows a smiley face.
Benefits
1. Keeps your family healthy. Airborne viruses thrive during the winter because our homes are dry. By adding a humidifier and increasing the humidity level in your home, germs may be reduced.
2. Improves sleep. Increasing the moisture in your home can soothe your nose and throat tissues. This can help reduce snoring.
3. Prevents dry skin. A dry home can work against us by withdrawing moisture from our skin. Increasing moisture can prevent this and help our bodies perform at their best.
4. Prevents damage to your home. I see changes in our home every winter. If your home is too dry, changes you may experience may include:
- Difficulty opening and closing doors
- Spaces or cracks in your hardwood floor
- Contracting drywall
- Cracks in your furniture
- Peeling paint or wallpaper
5. Prevents static electricity. Static electricity can cause frizzy hair and discomfort for your pets. If static electricity builds up, it can even cause damage to electronic devices.
6. Could save money on your heating bills. Increased moisture in the air could improve the warmth in your home. This could lead to lower thermostat settings. Common heating mistakes to avoid this winter.
7. Can relieve allergy symptoms. If you’re an allergy sufferer, increased humidity can help reduce dust mites and other allergens. This too, can help sooth your tissues in nose and throat.
Tips for keeping your humidifier clean.
1. Don’t use tap water. Tap water consists of minerals which can cause deposits in your humidifier contributing to mold growth. Use distilled water instead. If your unit contains a cartridge or filter, the type of water used may not matter. Refer to your owner’s manual for additional guidance.
2. Change the water often. Like a dehumidifier, stagnant water can lead to unwanted film or deposits.
3. Clean it weekly. Check your owner’s manual to see what’s recommended for weekly cleaning. Bleach or other disinfectants may work well.
4. Take the necessary steps for storage. Prior to storing it, make sure all water is discarded and give it a thorough cleaning. Don’t forget to discard used cartridges or filters. This will assure your humidifier is ready for next winter.
Do you have any tips you’d like to share? I’d love to hear your thoughts; please share them in the box below.
Source:
https://www.hvac.com/faq/recommended-humidity-level-home/
https://www.healthline.com/health/humidifiers-and-health
Topics: Family Safety
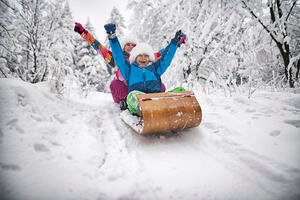
by Flagship Staff | Jan 6, 2021 | Blog
Sledding with friends and family is a great way to enjoy the outdoors. Not to mention, walking up the hill after an exhilarating ride down is a way to get some exercise during winter. However, if you’re not careful, sledding can cause serious injuries. Most injuries are a result of colliding with objects or other people.
Many years ago, on winter break, I took my daughter sledding. We jumped onto our tube and down the hill we went. It was fast and we were having so much fun. What I didn’t realize at the time is how fast it can turn into a scary situation. On one of our runs down, we hit a large bump which sent us tumbling. As it was happening, everything seemed to be in slow motion. Next to me, my daughter was tumbling head over heels like a rag doll. At the end of the tumble, we lay there a bit dazed and confused. Luckily, we were both ok. Unfortunately, it put an end to our fun day. On occasion my daughter still mentions it.
Here are some sledding injury statistics:
- Each year, approximately 20,000 children are injured and require medical care.
- Head injuries are the most common.
- Children 14 and younger are the ones most likely to be injured.
- Sleds can reach speeds of up to 25 miles per hour.
To keep your family safe, check out the safety tips below:
1. Go with your kids. If you have a hill near your house, you may be tempted to send them on their way. I’d recommend going with them. Even if you don’t sled, you can keep an eye on potentially harmful things that they’re not aware of. And in the event of an injury, you’ll be there to help. If you have kids who are five or younger, it’s recommended you sled with them.
2. Pick the perfect hill. As a kid, I remember sledding on just about any hill I could find. As a parent, I now realize the importance of checking out the hill ahead of time. Avoid sledding in areas with trees, fences, poles, or rocks. Remember, kids feel invincible and are looking for a thrill. They’re not paying attention to the hazards that could cause injuries. Also, avoid hills that are near streets or busy parking lots.
3. Consider visiting a ski hill. Some ski hills offer tubing lanes for those seeking speed and family fun. There are many benefits to tubing at a local ski hill such as:
- The tube lanes are designed for safety.
- Shelters can provide a place to warm up or rest.
- Beverages and food are available.
- Staff is available to assist with minor injuries.
- There are lights for tubing at night.
- There may be a track or lift system for taking you up to the starting point.
4. Invest in a good sled. Tubes and saucers are popular choices for many. They’re affordable and readily available. However, spending money on a sled that has steering and braking capabilities is a better option. Back in the day, my brother and I had sleds with these capabilities. Not only did we feel cool, they also kept us safe. We were able to steer around dangerous objects and avoid other sledders. In addition, we could slow our speed to stop quickly. Don’t forget to check the recommended age on the package before buying.
5. Talk to your kids about safety. Here are some guidelines to discuss before you go:
- Never go down the hill headfirst.
- Never go down a hill backwards or while standing.
- Avoid building a jump or ramp.
- Always keep arms and legs inside the sled.
- Walk up the side of the hill to avoid being struck by other sledders.
6. Buy your kids helmets. A winter sports helmet is a wise investment and can be used for many outdoor activities. Consider wearing one yourself if you plan on sledding with them.
7. Wear appropriate winter clothing. If you have a teenager who’s going sledding, more than likely they’re not dressed appropriately for winter conditions. Make sure your family wears hats, gloves/mittens, snow pants, boots, and winter jackets. In addition, moisture wicking clothing can help keep them warm and dry. Lastly, avoid wearing scarves and other loose clothing that can get caught.
8. Stay hydrated. Staying hydrated during winter activities is very important. Dehydration can happen quickly in cold weather because your body is working hard to stay warm. Check out “8 Tips for Hydrating in Cold Weather.”
by Flagship Staff | Dec 22, 2020 | Blog
Unfortunately, every year when the first snowfall arrives, it’s common to see cars sliding through intersections or into ditches. It seems like that first snowfall catches many drivers off guard. If this is your first winter with a teen driver, it may be even more stressful. Winter driving requires patience and skill. To acquire the appropriate skill necessary to stay safe, it takes practice.
This blog will discuss:
- Winter driving facts
- Common winter accidents and insurance
- Ways to keep your teen drivers safe
Winter Driving Facts and Stats
- Seventeen percent of all vehicle crashes occur during snowy conditions.
- Approximately 70% of U.S. roads are in areas that receive annual snowfall.
- Each year, approximately 116,000 people are injured on snowy or icy roads.
- Stopping your car on snow and ice can take 6 to 10 times longer.
In heavy snow, freeway speeds should be reduced by as much as 40%.
- Four-wheel and all-wheel drive vehicles don’t stop quicker than other vehicles.
Winter car accidents and insurance
Poor road conditions have a major impact on how your car handles. Add poor visibility, and winter driving can be extremely dangerous. If your teen driver damages your car or another person’s property, it’s important to make sure you have the right insurance coverage and adequate limits to pay for damages.
If your teen slides through an intersection or into a ditch, here’s how different types of insurance coverage may apply.
- Auto Liability insurance covers injury or property damage caused to a third-party.
- Collision insurance provides coverage for damage to your teen’s car.
- Medical payments or Personal Injury Protection (PIP) provides coverage for injuries sustained by anyone in the car driven by your teen.
- Towing coverage may be provided through your insurance policy. If it’s not, I‘d recommend adding it. The benefit of this coverage is that no money needs to be paid to the towing company at the time of the accident.
Ways to keep your teen drivers safe
To help your teens excel and stay safe driving this winter, enrolling them in a winter driving school may be just what they need. Road America’s Winter Driving School sponsored by West Bend allows teen drivers to practice winter driving in a safe environment.
The instructors at Road America teach techniques for handling different winter driving conditions. Those techniques include:
- Skid control and prevention
- Braking with ABS and without
- Collision avoidance maneuvers
- Proper vision skills
If you don’t have a winter driving school near you, make sure you talk to your teen about winter driving or check out the helpful videos below.
Tips for Safe Winter Driving – Winter Driving Hazards & Cornering Overview
Tips for Safe Driving – Winter Braking ABS
Essential Winter Driving Tips – Consumer Reports
Winter Driving Tips You Need to Know
Everything You Need to Know About Driving In The Snow
Do you have any tips you’d like to share? I’d love to hear them. Please share them in the box below.
Source:
https://www.highways.org/wp-content/uploads/2014/02/Brochure-FINAL-LoRes.pdf
https://driving-tests.org/driving-statistics/
Topics: Teen Safety, Weather
